I Built a Real 3-2-1 Backup System with TrueNAS, Offsite Replication, and UNAS

What started as, “I just need a backup,” turned into a full rebuild.
I wanted a real 3-2-1 backup system for my homelab without signing up for a giant cloud bill to cover roughly 30TB of data. That ended up meaning an offsite TrueNAS box, a redesign of the main NAS, and eventually a third copy on a different platform so pulling back one file would not turn into a ZFS project.
What I wanted from backup
Traditionally, 3-2-1 means:
- 3 copies of your data
- 2 different media or platforms
- 1 copy offsite
For my homelab, I wanted more than just extra copies sitting somewhere.
I wanted:
- an offsite copy I controlled
- predictable costs instead of another monthly subscription
- a recovery process I actually understood
- a simpler way to restore individual files when needed
- enough confidence in the backup to let me rebuild the main NAS safely
That last part ended up mattering more than I expected.
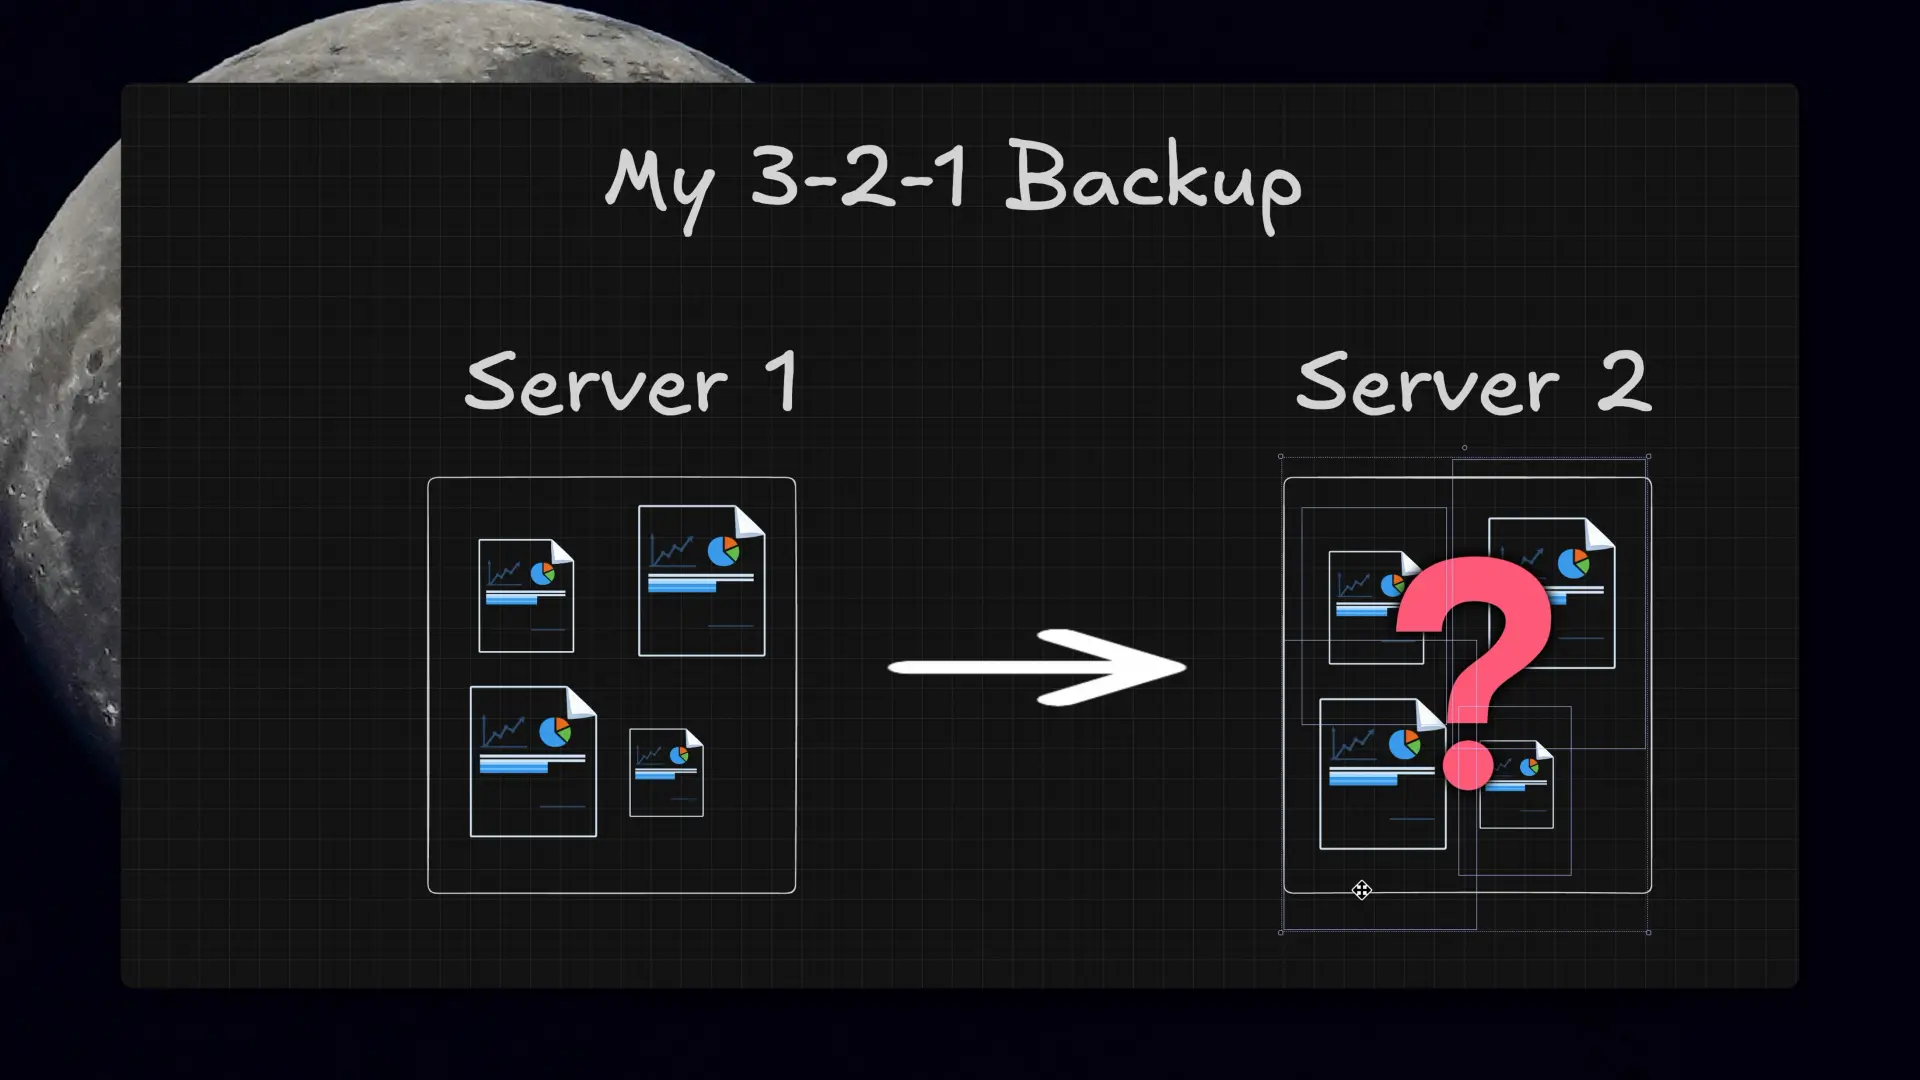 My first mental model was basically “copy files from one server to another.” The final setup ended up being a lot more intentional than that.
Why I did not just use cloud backup
Cloud backup was not the right fit here.
At around 30TB of NAS data, “just throw it in the cloud” gets expensive fast. Backblaze B2 looked good until I ran the numbers at my scale. Glacier and Deep Archive looked better on paper, but the restore time and retrieval costs changed the math pretty quickly.
I wanted something I own, control, and understand, with an upfront hardware bill instead of an endless backup subscription.
Starting point: the primary NAS
The main system is a TrueNAS box at home holding roughly 30TB of data.
It is also not just a pile of files. It runs apps and services, so the problem is not just “do the files exist somewhere else?” It is structure, config, app data, and whether the restore path makes sense when something actually breaks.
That was when a loose pile of backup jobs stopped sounding good enough.
The offsite TrueNAS system
The first goal was simple: get one real offsite copy.
Since I already have access to local colocation space, that was the obvious place to put it. I only had 1U left in the rack, it needed remote management, and it still had to make financial sense.
I thought about doing a custom build, but once you price out short-depth cases, drive support, and remote management, a DIY 1U backup box gets expensive in a hurry.
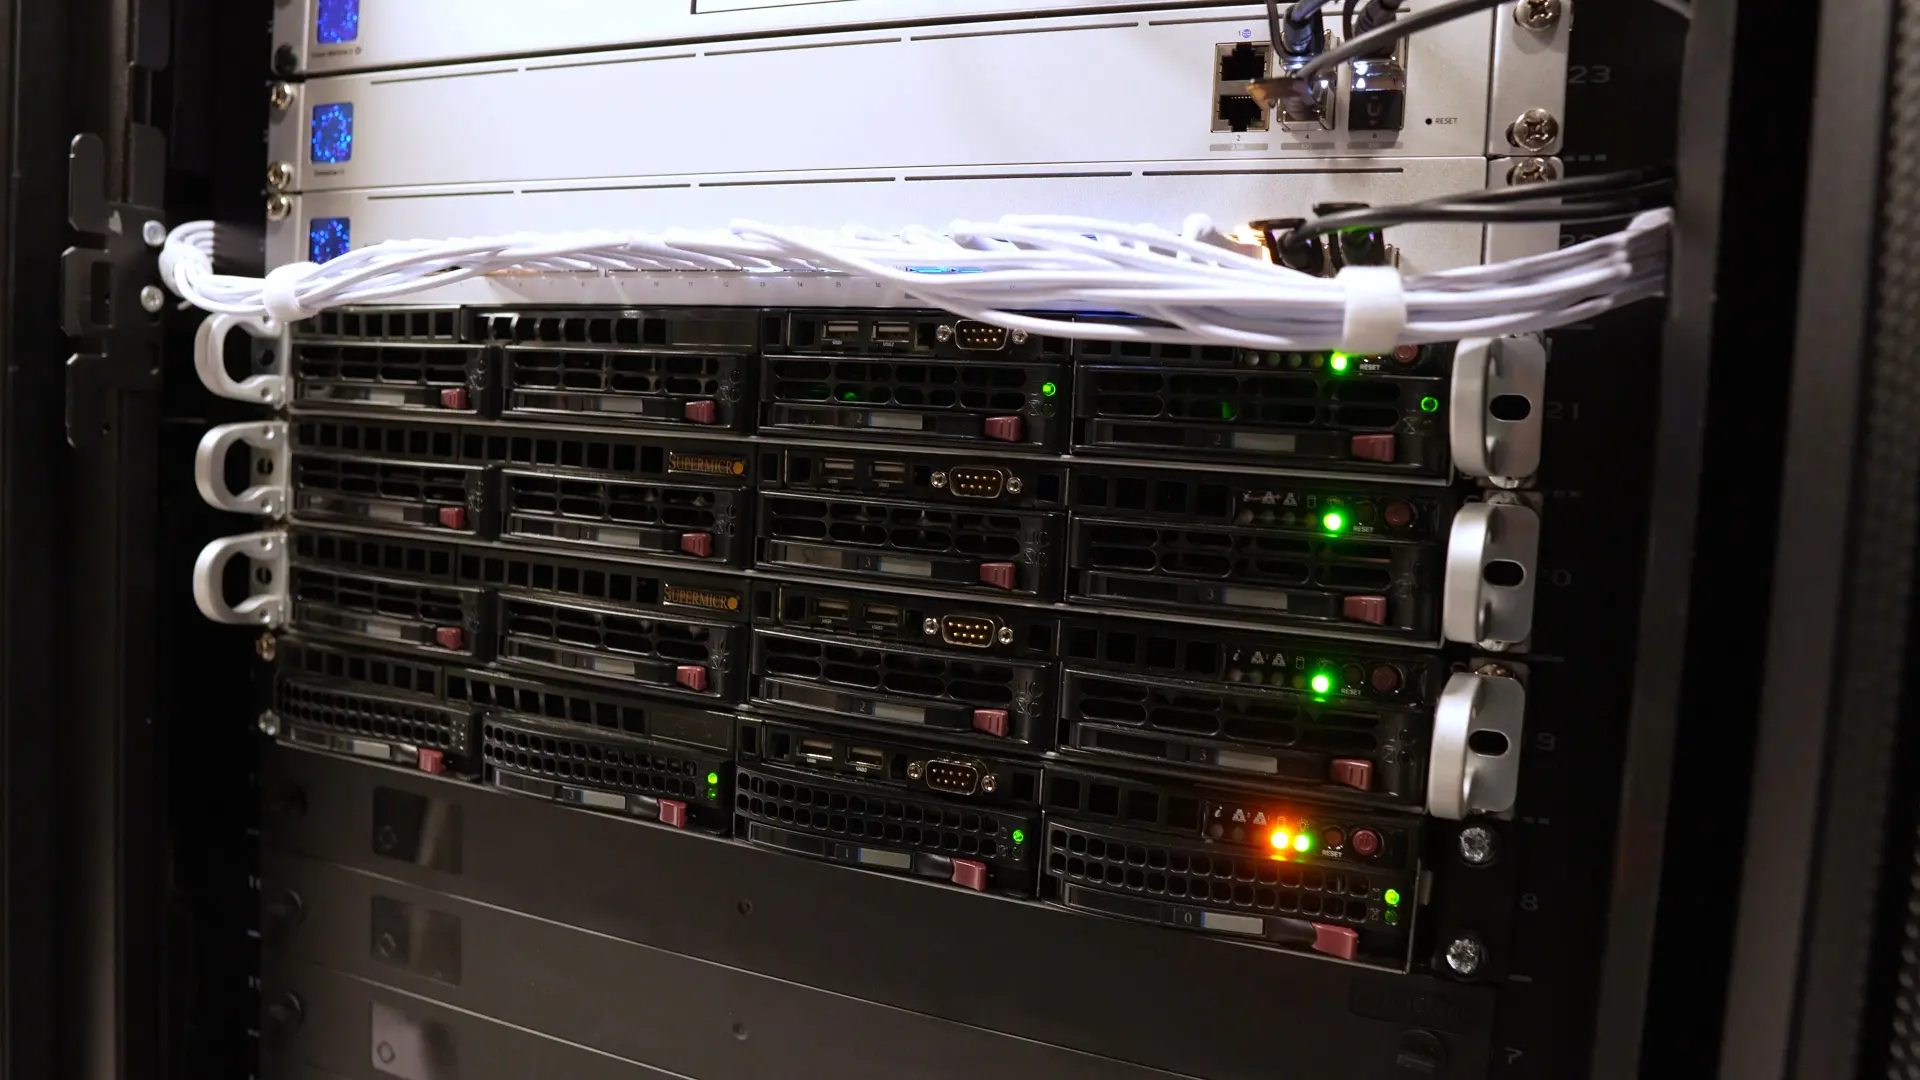
I ended up buying a familiar 1U Supermicro server off eBay. That was mostly a practical decision. I already run three other 1U servers on the same platform, I know the hardware, I have spare parts, and standardizing won over doing something custom just for this.
Hardware choices and compromises
This backup system was intentionally different from the main NAS.
The biggest constraint was four drive bays.
I went with recertified 22TB Seagate enterprise drives, which is pretty normal for me at this point. With only four bays, I pretty much had to go big on capacity. And honestly, between used server pricing, RAM, and drives, this is not exactly a cheap time to build a NAS.
Because this is a backup target and not the primary system, I was willing to make different tradeoffs. With only four drives to work with, RAIDZ1 made the most sense: enough protection for a backup box without giving up too much usable capacity.
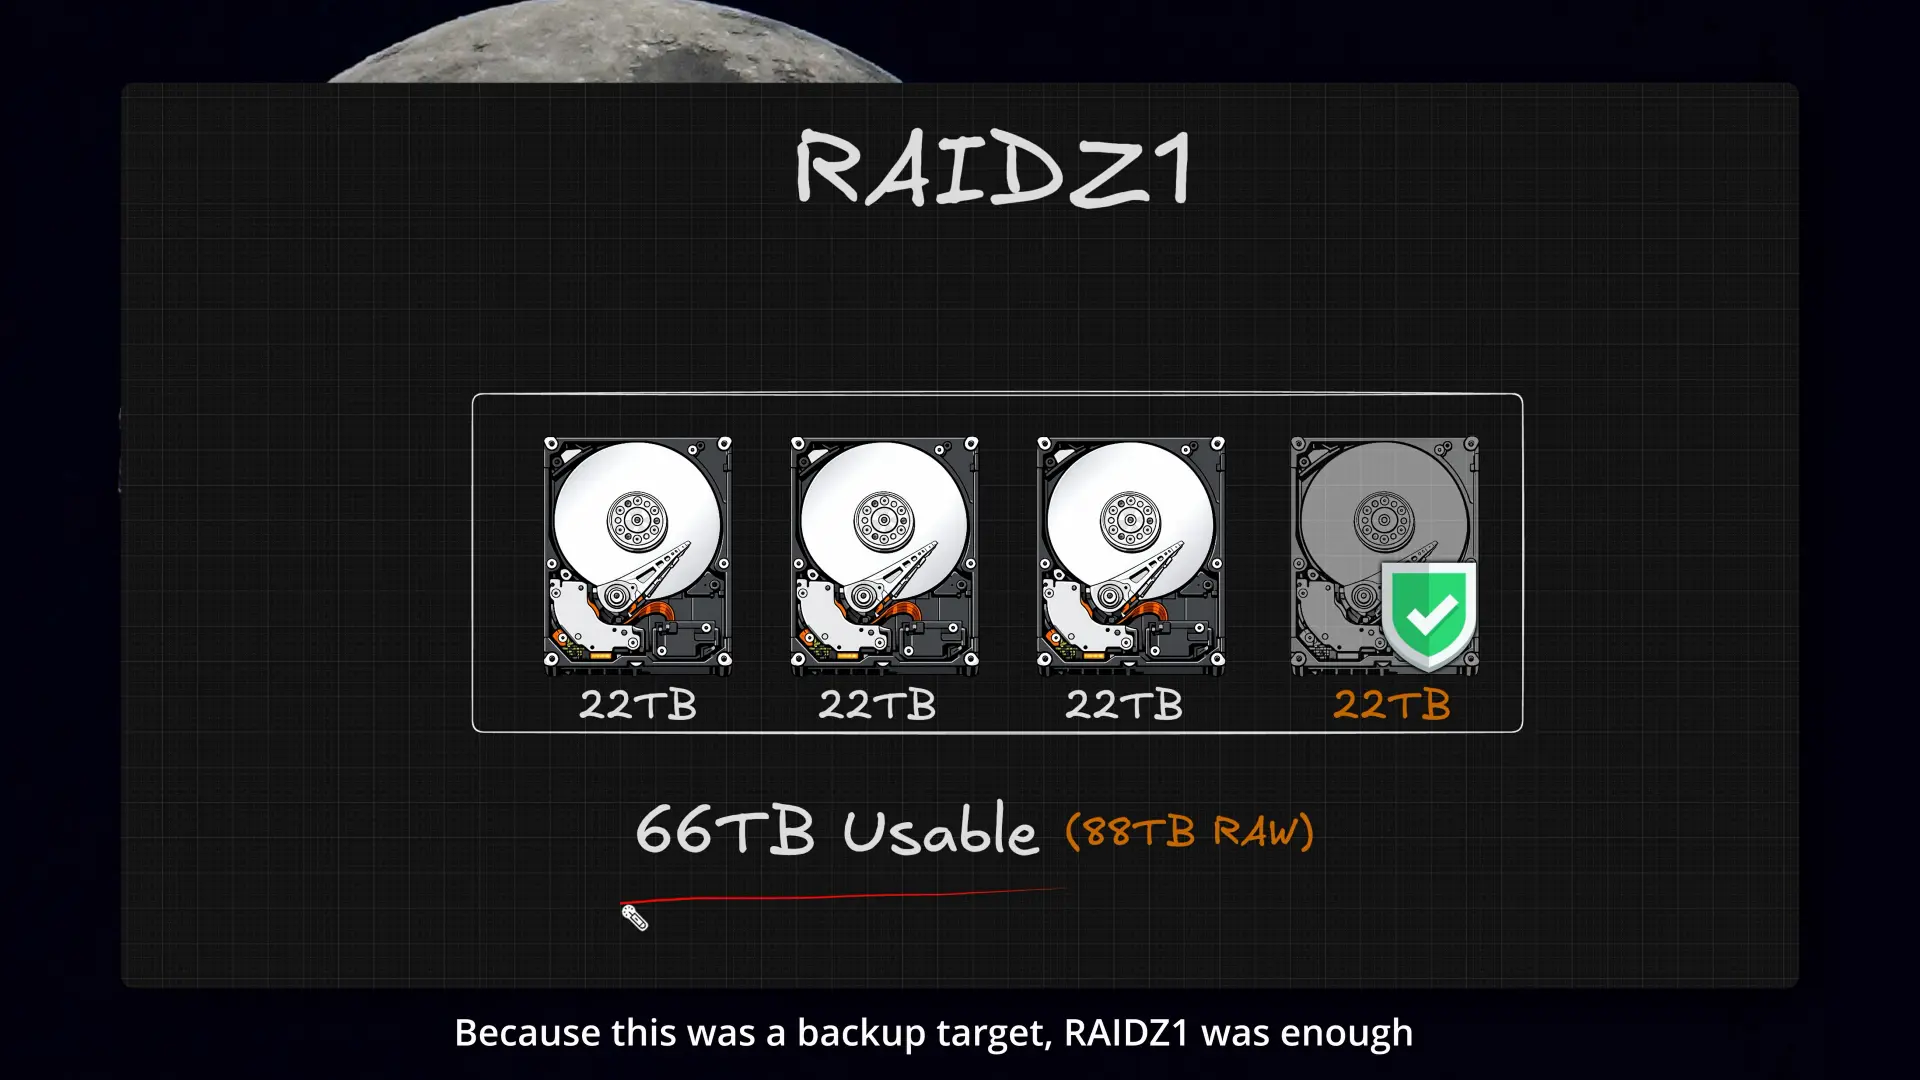 Four 22TB drives in RAIDZ1 gave me about 66TB usable for the offsite backup box.
For boot, I used a SATA DOM. It is just a cleaner fit for this kind of system than hanging everything off a USB drive.
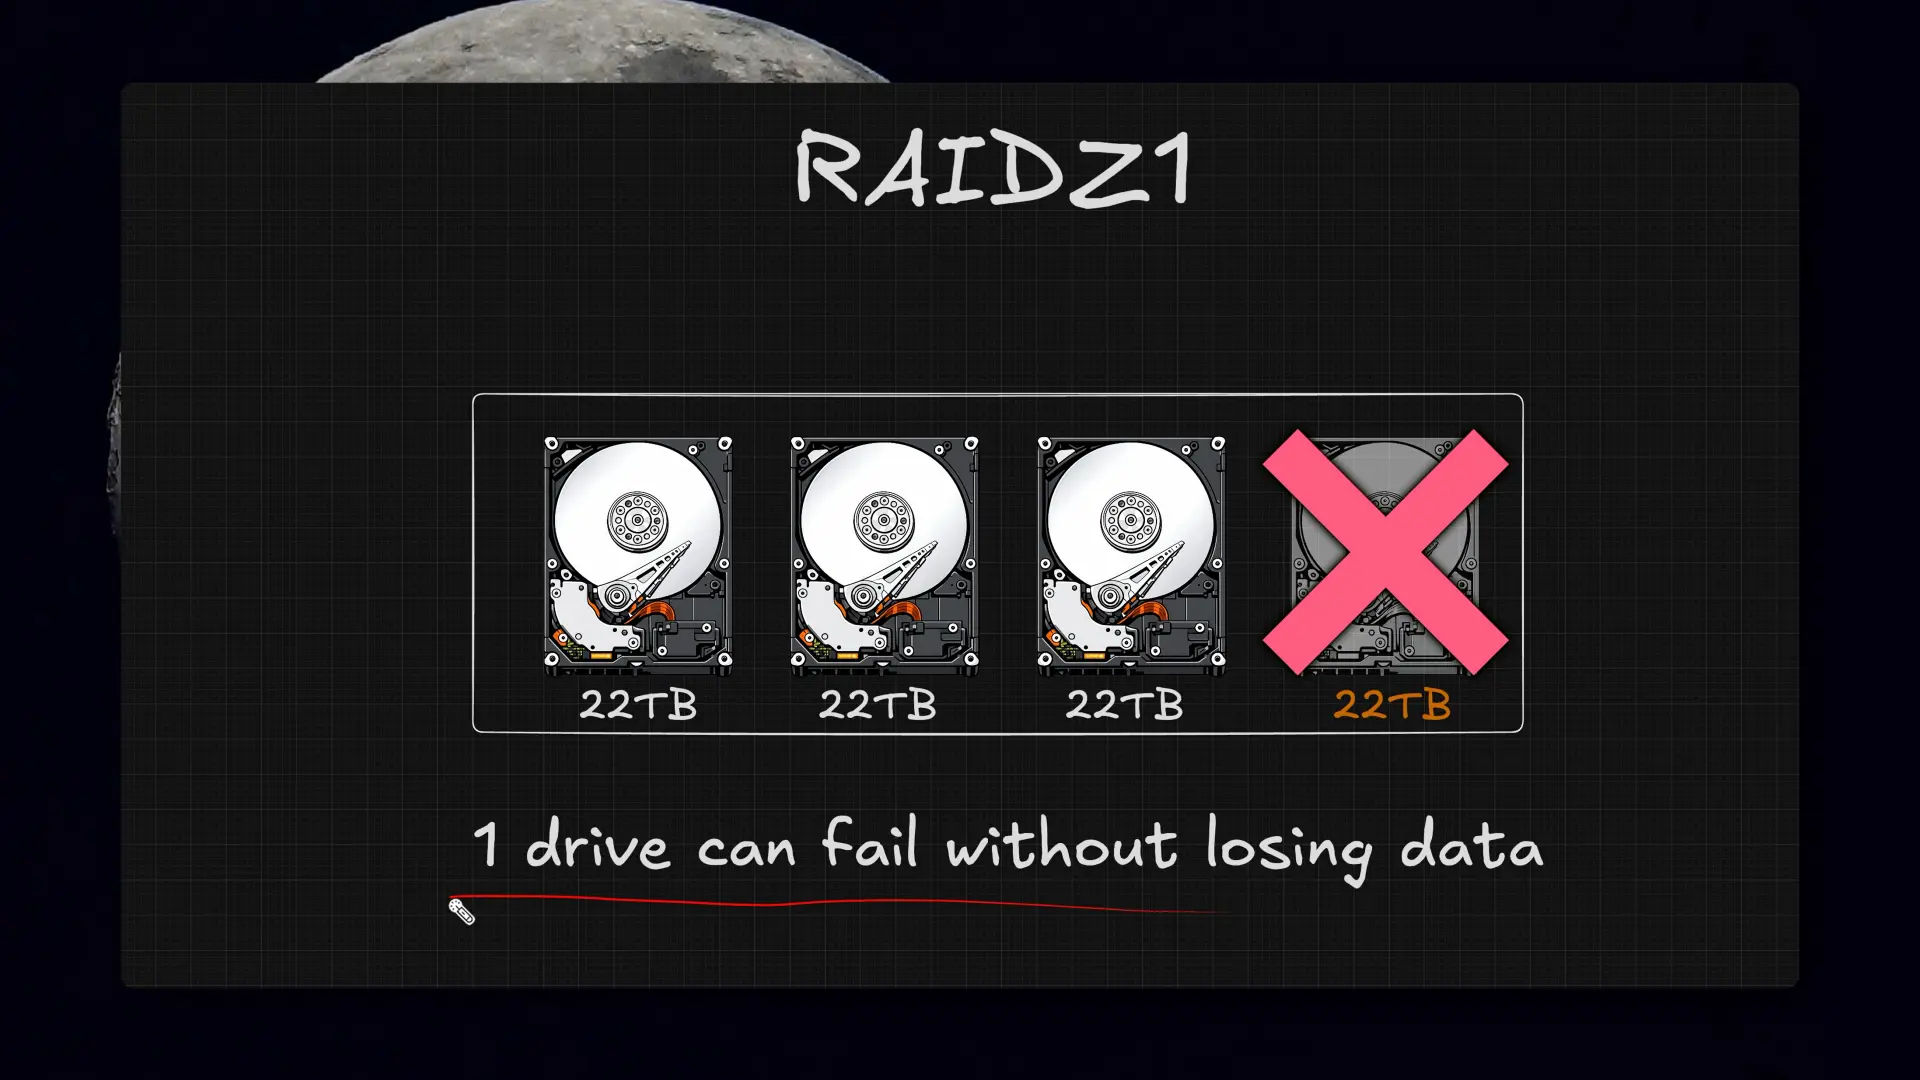 For a backup target, surviving a single drive failure felt like the right tradeoff.
The included RAID controller was another issue, because TrueNAS really wants direct disk access. That card could not be flashed to IT mode, so it had to go. I ended up wiring the drives directly with a few old SATA cables from the box of random cords every IT person somehow accumulates.
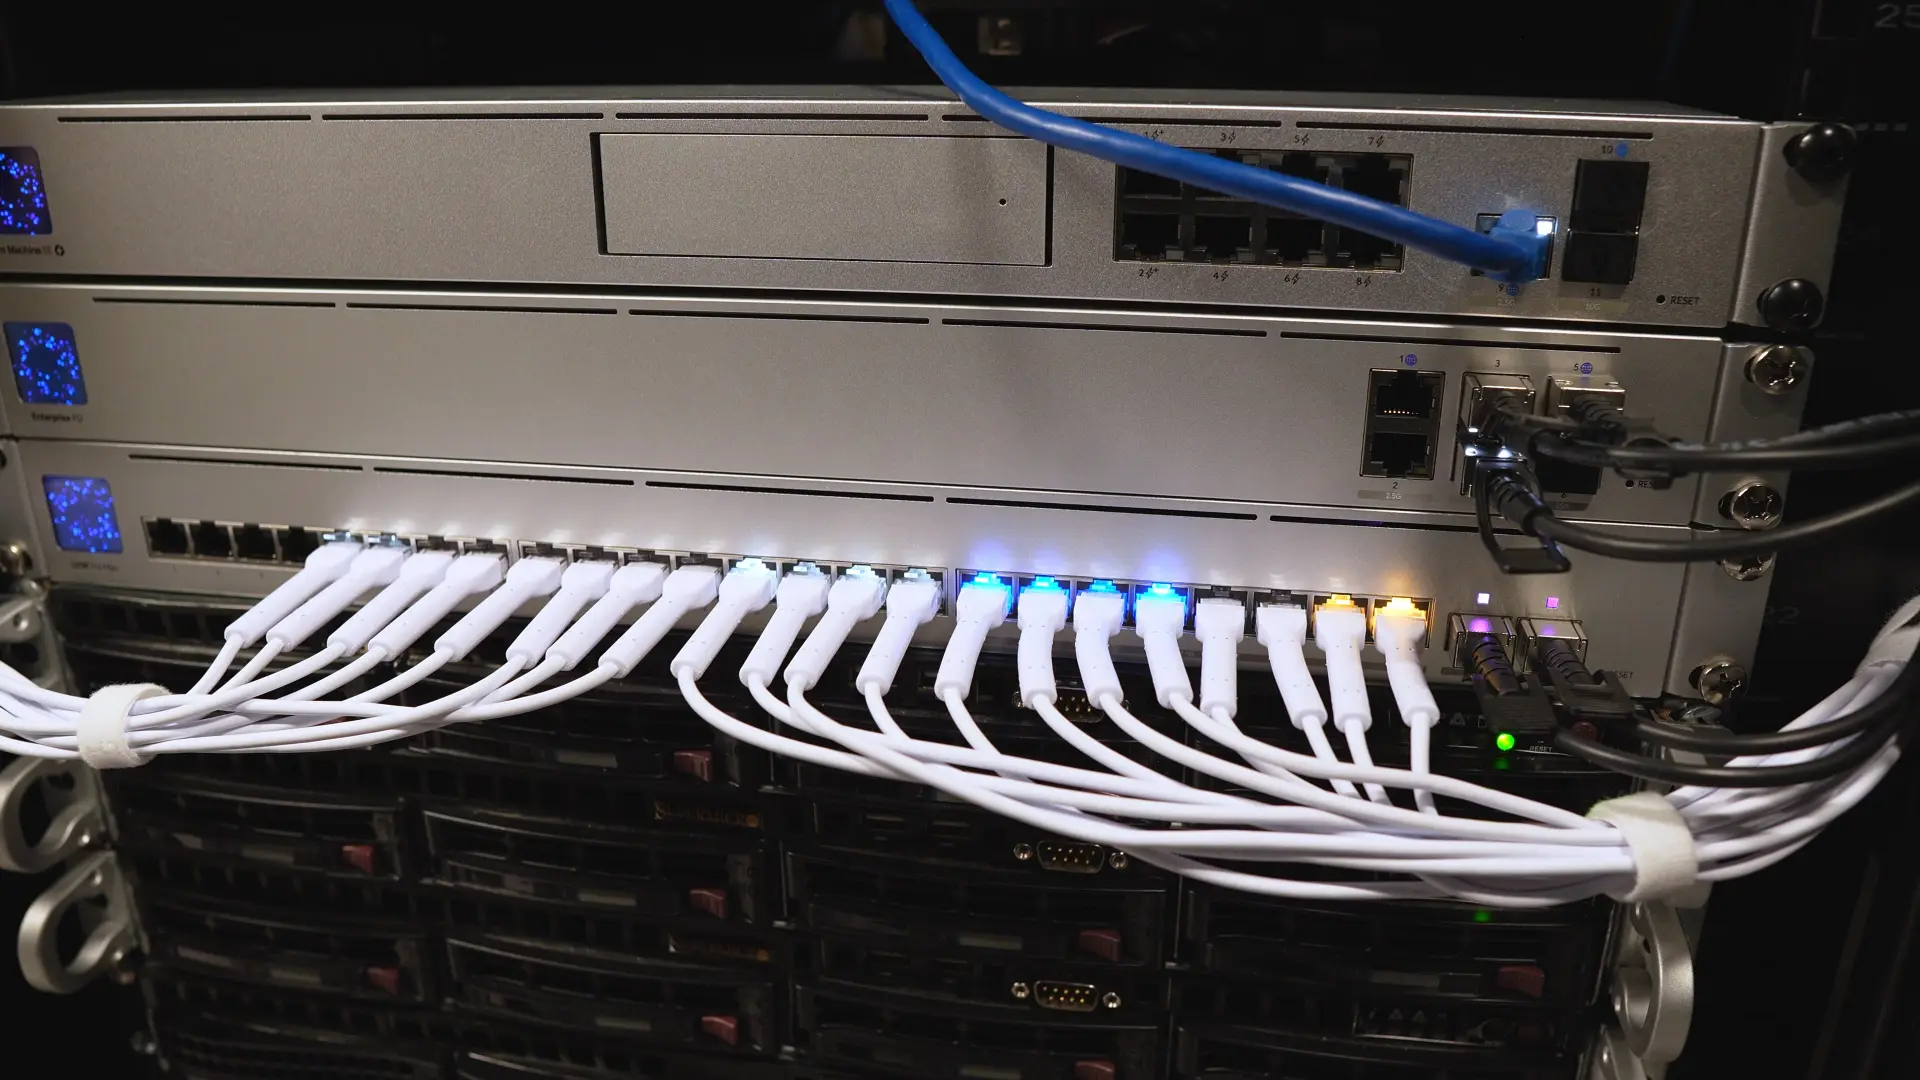
I also added 10GbE temporarily for the initial local sync before the system moved offsite. Once it went into colo, I swapped that out for a permanent 2.5GbE card because I am not running 10 gig switching there yet, and upgrading all four servers just for this backup job would have pushed the cost up a lot.
Setting up replication in TrueNAS
Once the hardware was done, it was time to make it useful.
In ZFS terms, this is snapshot replication. Instead of manually copying files around, I am sending point-in-time snapshots of datasets to the second system.
That meant creating snapshot tasks first. After that, replication in TrueNAS is pretty simple: create a task under Data Protection, choose the datasets that already have snapshots, and send them over SSH to the remote system.
I used a dedicated replication account for this rather than doing everything as admin.
The initial sync still took a while, even over 10GbE. Once it settled in, replication exposed something important: my dataset structure and retention policies were not nearly as clean as I wanted them to be.
 Once replication was running, it was very obvious I had let snapshot tasks sprawl.
When backup exposed a bigger problem
Once snapshots and replication tasks were in place, it became very obvious whether the dataset layout actually made sense.
In my case, a lot of that structure had grown organically over time. It worked, but it was messy, and it made backup and recovery harder to reason about than they needed to be.
That was when this stopped being “build a backup box” and turned into “fix the whole storage layout while I am here.”
Why the old layout had to change
The more I looked at snapshots, replication, retention, and dataset structure, the more obvious it became that the main NAS was built around older assumptions.
That pool was something I put together years ago, before I really knew how the system was going to be used long term: ten 14TB drives in five mirrors, plus a special vdev, SLOG, and L2ARC.
To be clear, that setup worked. Mirrors are still a great way to build storage, especially when you are still figuring things out. But at ten drives, for this workload, it was giving me more IOPS than I needed, and the capacity tradeoff stopped feeling worth it.
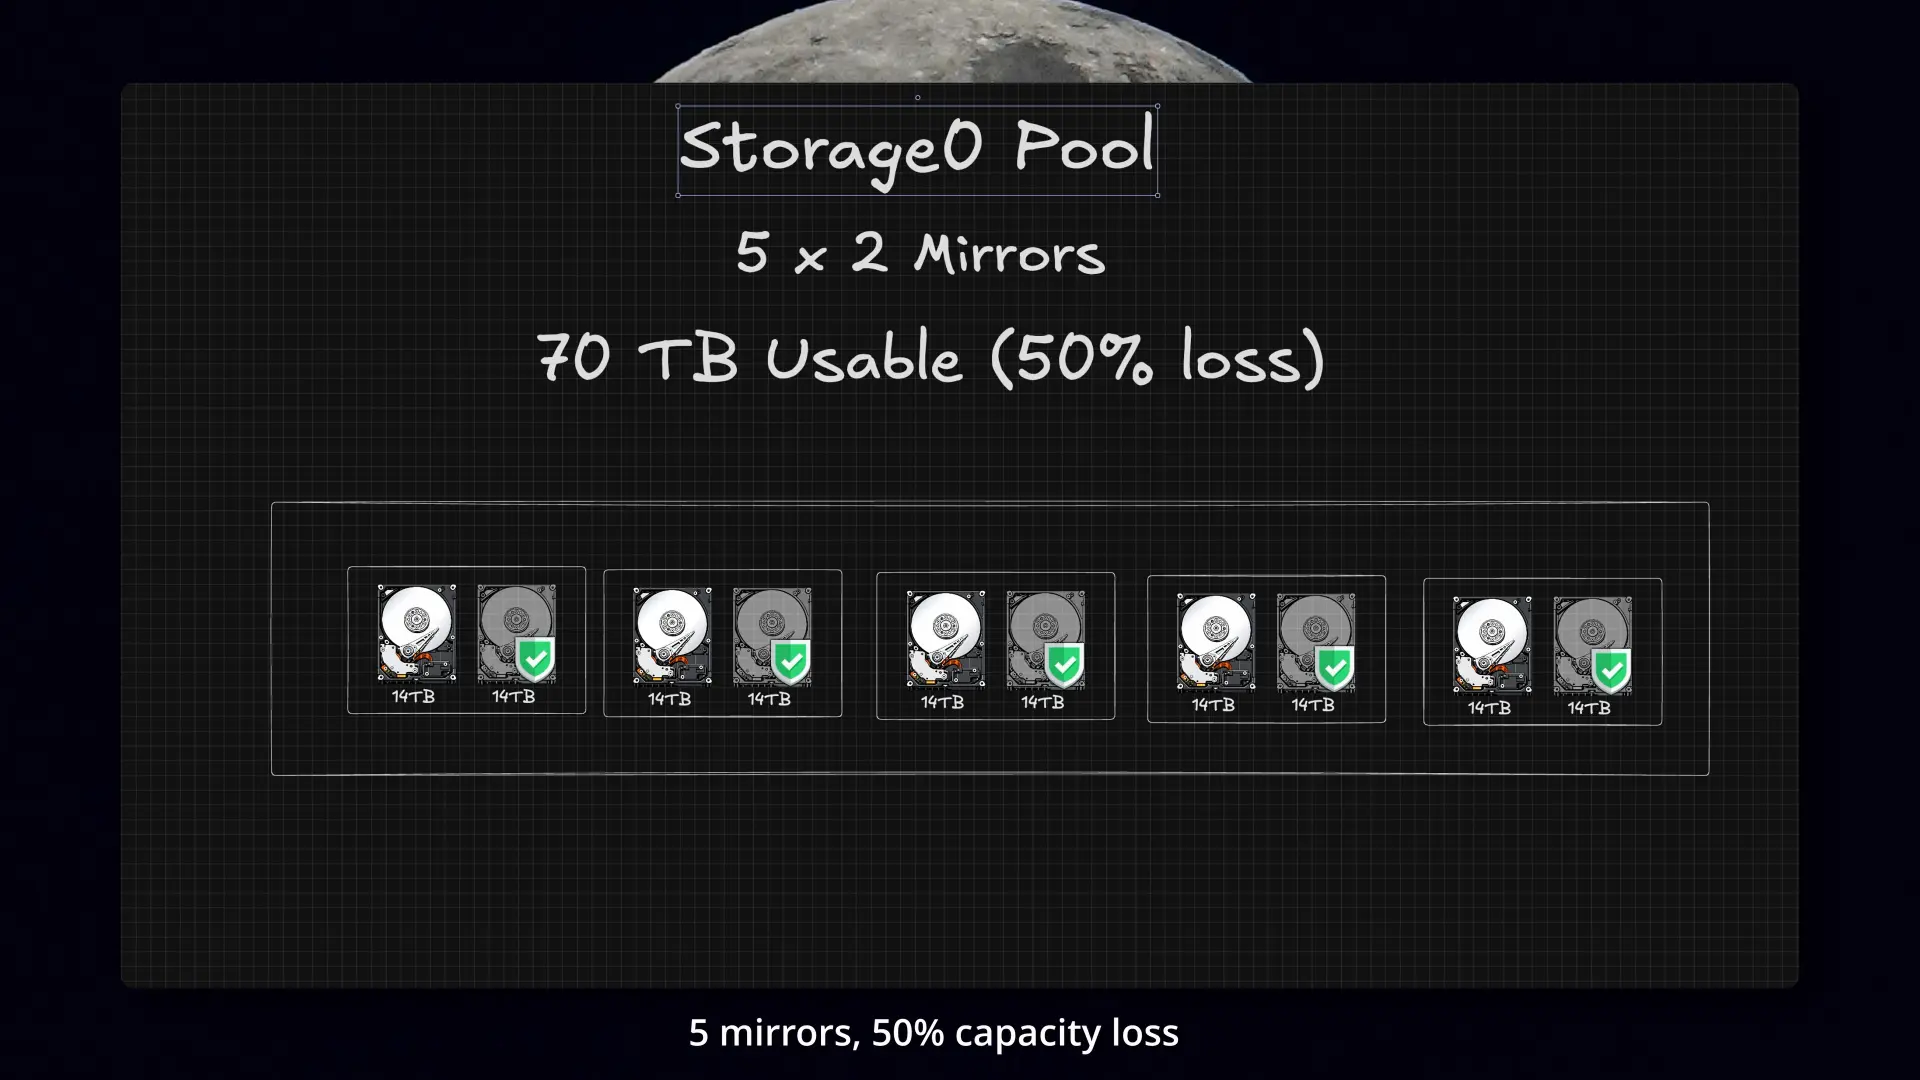 The old pool was five 2-drive mirrors: fast, but not a great long-term capacity tradeoff for this workload.
Knowing how the system actually gets used now, if I were starting from scratch, I probably never would have built it that way.
This was also the point where the second NAS stopped being just an offsite backup. It was the only reason the rebuild was possible at all, because I needed another ~30TB of usable space to hold everything while I rebuilt the main NAS.
The redesign
Everything had grown inside one big pool, and over time that made snapshots, replication, and retention harder to manage than they should have been.
I did not have clean dataset boundaries based on how the data was actually being used, so the backup policy had started to sprawl.
Instead of one giant pool trying to do everything, I split it up more intentionally:
- Apps on NVMe for containers and app data
- Projects on NVMe for active video work
- Bulk storage on HDDs for documents, media, Time Machine backups, object storage, NFS shares, and larger datasets that mostly care about capacity
That made backup and replication a lot cleaner, gave me better workload separation, improved performance where it actually mattered, and let me move the bulk storage side to 2 x 5-wide RAIDZ2 vdevs, which bought back usable space while also improving protection.
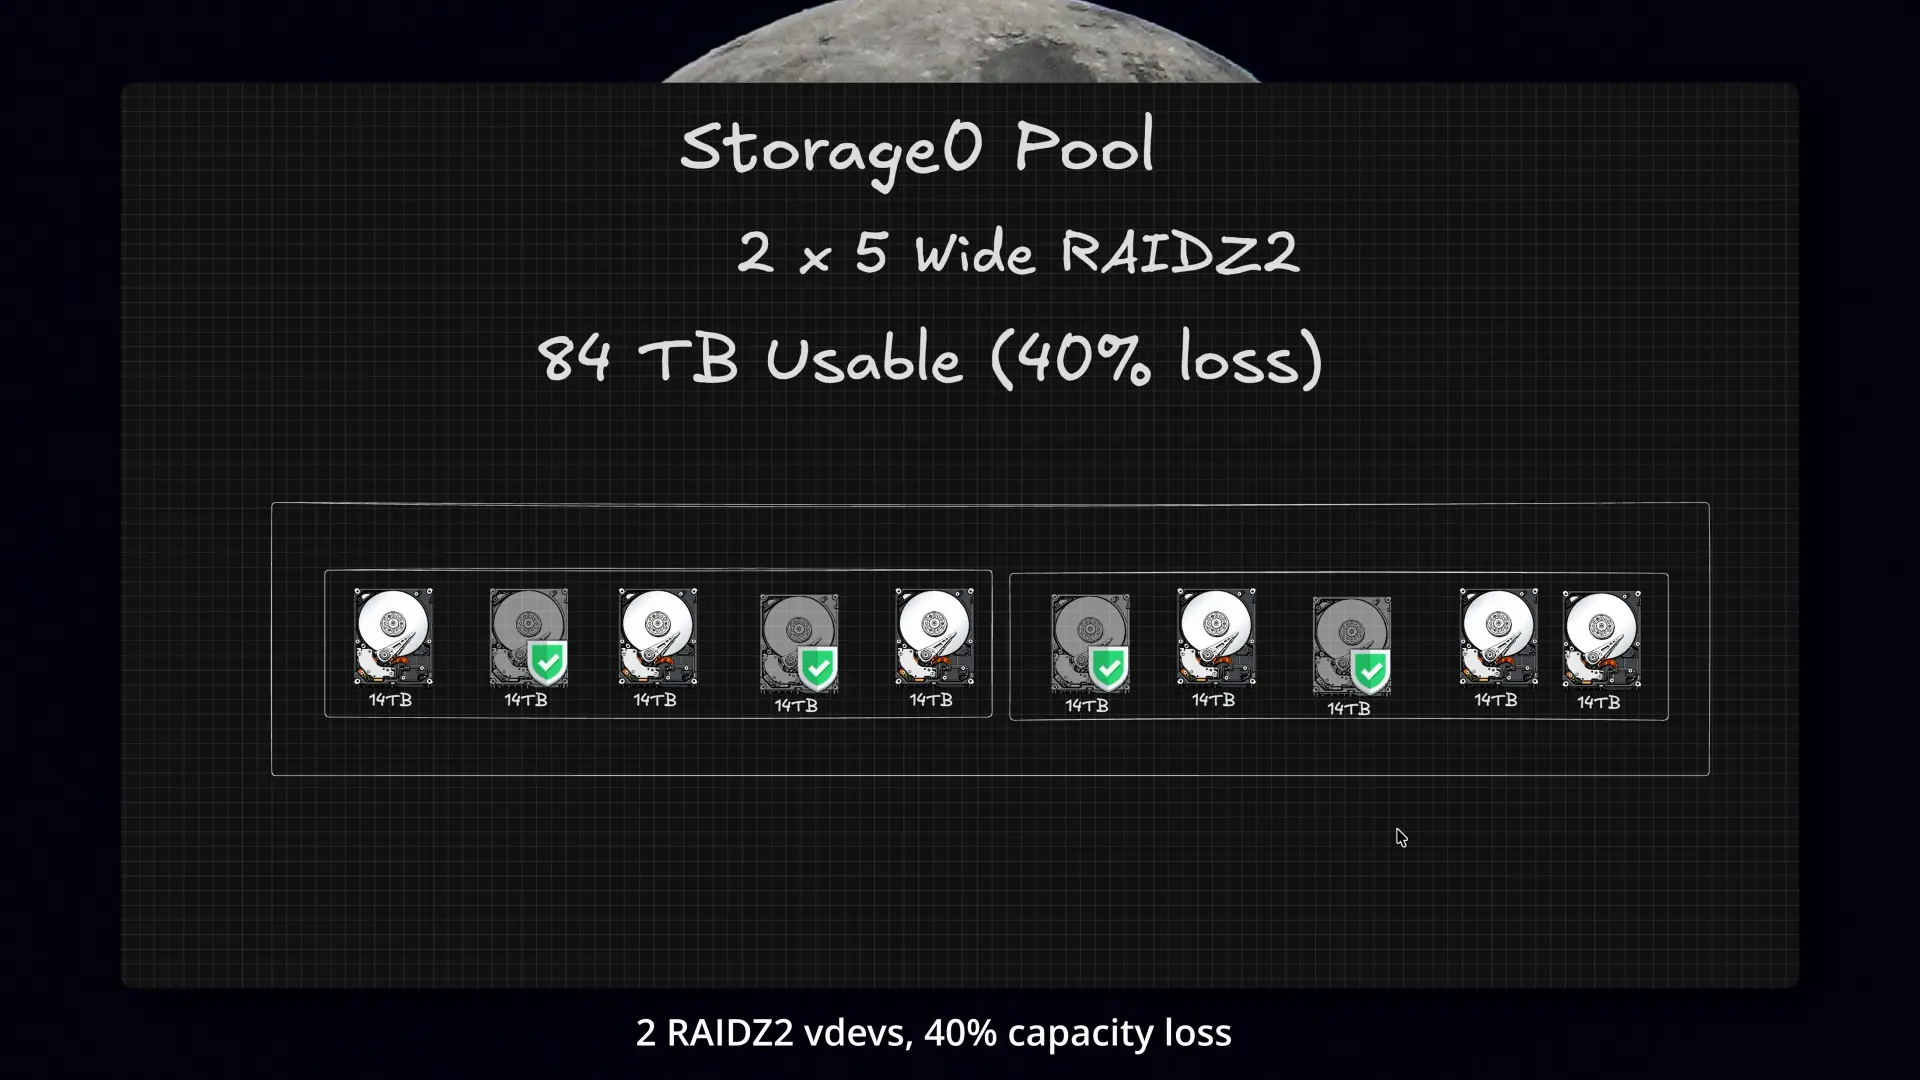 Rebuilding as 2 x 5-wide RAIDZ2 vdevs bought back space and improved fault tolerance.
Migration and restore process
Once I had the new layout planned out, it was time for the scary part.
Before touching the main pool, I:
- exported configs
- documented the share and dataset setup
- made sure the backup side was fully current
- stopped SMB, NFS, and apps
- ran a final sync
- verified the backup side before doing anything destructive
Only after that did I destroy the original pool and rebuild the storage layout from scratch.
From there, it was less like hitting “restore” and more like doing a careful data shuffle into the new structure: moving data back into the right pools, reconnecting shares and services, and making sure everything matched the new layout before bringing it back online.
Once everything was back in place, snapshots and replication were a lot easier to manage.
The part of 3-2-1 that still felt unfinished
At that point I had:
- a primary TrueNAS system
- an offsite TrueNAS system
That is already a pretty good place to be.
But I still was not done.
Even with an offsite copy, I still did not have all three copies, and I was still missing the second platform I wanted for 3-2-1. I also wanted a simpler restore path for the cases where I just need one file back quickly.
 This was the point where I knew I wanted the third copy on a different platform, not just another ZFS box.
Pulling back a file through a UI is very different from dealing with ZFS snapshots, restoring to a temporary dataset, and copying files back out manually.
Why I added the UNAS
So I added the Ubiquiti UNAS.
I could have built another TrueNAS box, but that still would have left all three copies tied closely to the same stack. Even if the risk is low, I liked having one copy on a completely different platform.
The UNAS also fit the environment well:
- 1U form factor
- low power
- dual 10GbE
- simple appliance-style setup
More than that, it gave me both the extra copy I still needed and a much simpler restore experience.
With UniFi Drive, I get browser-based access, file previews, and quick one-off restores. That is a very different experience from restoring or mounting a ZFS dataset just to recover one thing.
That kind of simple file-level restore is one of the nicest things about services like Backblaze, and this gave me some of that convenience in my own rack.
Ubiquiti had actually sent me the UNAS months ago for testing, and this project was the first time I found a use for it that made sense in my homelab. This video is not sponsored, and they did not even know I was making it.
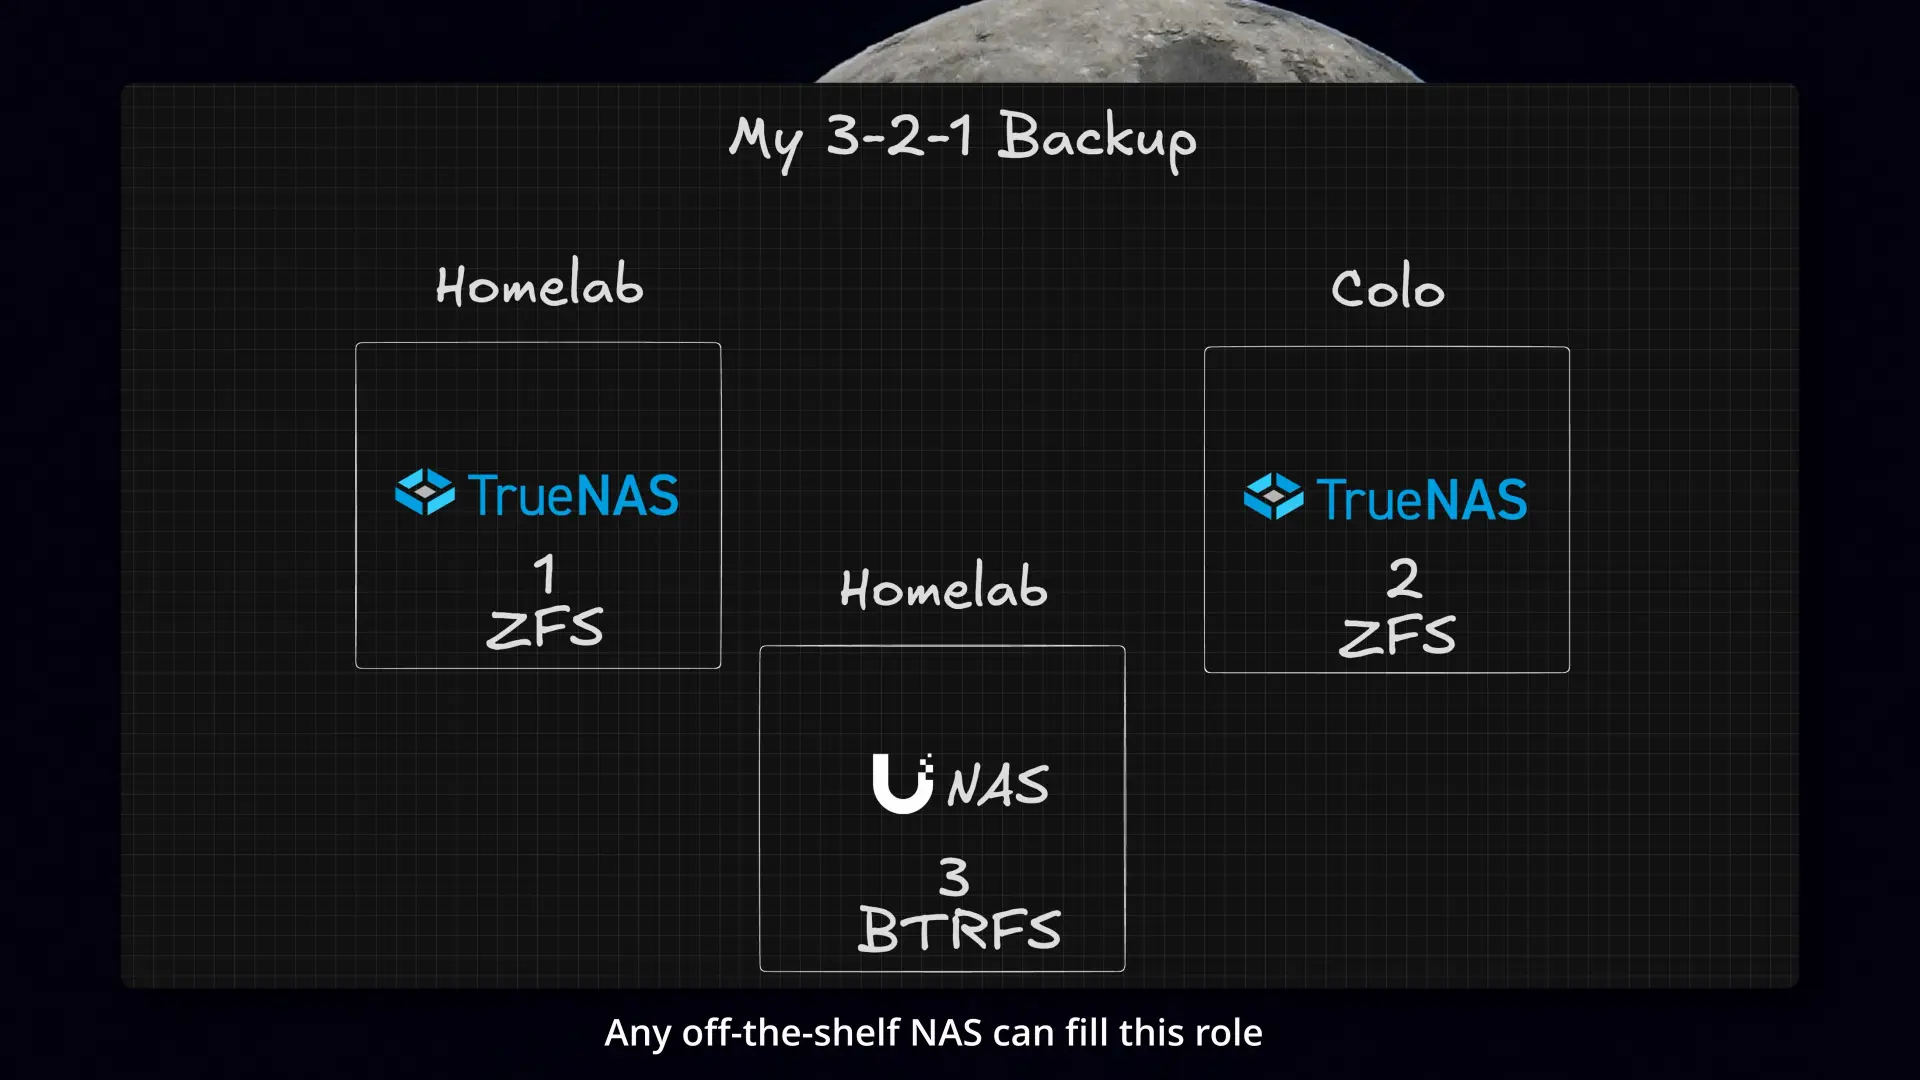
Final backup architecture
The final setup ended up looking like this:
- Copy 1: Main TrueNAS system at home
- Copy 2: Snapshot replication to the offsite TrueNAS system in colocation
- Copy 3: Daily file-level copy to the UNAS share
That third piece runs from the main TrueNAS system in a small Docker container I put together, which handles the copy over SMB to the UNAS.
compose.yaml
1
2
3
4
5
6
7
8
9
10
11
12
13
services:
  truenas-to-unas:
    image: alpine:3.20
    container_name: truenas-to-unas
    restart: unless-stopped
    env_file:
      - .env

    volumes:
      - /mnt/primary/documents/yourdocuments:/src/yourdocuments:ro
      - ./data:/data

    command: ["/bin/sh", "/data/start.sh"]
.env
1
2
3
4
5
6
7
8
9
10
11
12
13
14
15
16
17
18
19
20
TZ=Etc/UTC
RCLONE_LOG_LEVEL=INFO
RUN_MODE=cron
INTERVAL=3600
CRON_SCHEDULE=0 1 * * *
RUN_ON_START=0

# Rclone configuration for the UNAS SMB connection
RCLONE_CONFIG_UNAS_TYPE=smb
RCLONE_CONFIG_UNAS_HOST=192.0.2.10
RCLONE_CONFIG_UNAS_USER=example-backup-user
# docker run --rm rclone/rclone:latest obscure 'YOUR_PASSWORD'
RCLONE_CONFIG_UNAS_PASS=your-obscured-password
RCLONE_CONFIG_UNAS_DOMAIN=none

# Refuse to sync if the source has fewer than this many files
MIN_FILES_DEFAULT=10

# Refuse to sync if file count drops more than this percent vs the last good run
MAX_DROP_PCT_DEFAULT=50
start.sh
1
2
3
4
5
6
7
8
9
10
11
12
13
14
15
16
17
18
19
20
21
22
23
24
25
26
27
28
#!/bin/sh
set -eu

apk add --no-cache rclone ca-certificates tzdata >/dev/null

: "${TZ:=Etc/UTC}"
: "${RUN_MODE:=cron}"
: "${RUN_ON_START:=1}"
: "${INTERVAL:=3600}"
: "${CRON_SCHEDULE:=0 1 * * *}"

echo "$(date -Iseconds) start (mode=$RUN_MODE run_on_start=$RUN_ON_START tz=$TZ)" | sed "s/${RCLONE_CONFIG_UNAS_PASS:-}/REDACTED_PASS/g"

if [ "$RUN_ON_START" = "1" ]; then
  /data/run_once.sh || true
fi

if [ "$RUN_MODE" = "cron" ]; then
  printf "%s /data/run_once.sh\n" "$CRON_SCHEDULE" > /etc/crontabs/root
  echo "$(date -Iseconds) cron schedule: $CRON_SCHEDULE"
  exec crond -f -l 8
fi

while true; do
  /data/run_once.sh || true
  echo "$(date -Iseconds) sleeping ${INTERVAL}s"
  sleep "$INTERVAL"
done
run_once.sh
1
2
3
4
5
6
7
8
9
10
11
12
13
14
15
16
17
18
19
20
21
22
23
24
25
26
27
28
29
30
31
32
33
34
35
36
37
38
39
40
41
42
43
44
45
46
47
48
49
50
51
52
53
54
55
56
57
58
59
60
61
62
63
64
65
66
67
68
69
70
71
72
73
74
75
76
77
78
79
80
81
82
83
84
85
86
87
88
89
90
91
92
93
94
95
96
97
98
99
100
101
102
103
104
105
106
#!/bin/sh
set -eu

: "${MIN_FILES_DEFAULT:=10}"
: "${MAX_DROP_PCT_DEFAULT:=50}"
: "${RCLONE_LOG_LEVEL:=INFO}"

: "${RCLONE_CONFIG_UNAS_HOST:?missing RCLONE_CONFIG_UNAS_HOST}"
: "${RCLONE_CONFIG_UNAS_USER:?missing RCLONE_CONFIG_UNAS_USER}"
: "${RCLONE_CONFIG_UNAS_PASS:?missing RCLONE_CONFIG_UNAS_PASS}"

mkdir -p /data/state /data/locks

job="yourdocuments"
src="/src/yourdocuments"
dst="unas:backup_share/documents/yourdocuments"
state="/data/state/${job}.count"

redact() {
  sed \
    -e "s/${RCLONE_CONFIG_UNAS_USER}/REDACTED_USER/g" \
    -e "s/${RCLONE_CONFIG_UNAS_PASS}/REDACTED_PASS/g" \
    -e "s/smb:\/\/[^@]*@/smb:\/\/REDACTED_USER@/g"
}

file_count() {
  find "$1" -type f 2>/dev/null | wc -l | tr -d " "
}

lock="/data/locks/run.lock"
if ! mkdir "$lock" 2>/dev/null; then
  if pgrep -f "rclone (sync|copy)" >/dev/null 2>&1; then
    echo "$(date -Iseconds) SKIP: previous run still active" | redact
    exit 0
  fi
  echo "$(date -Iseconds) STALE LOCK: clearing and continuing" | redact
  rm -rf "$lock"
  mkdir "$lock"
fi
trap 'rm -rf "$lock" >/dev/null 2>&1 || true' EXIT

echo "$(date -Iseconds) cycle start" | redact

if [ ! -d "$src" ]; then
  echo "$(date -Iseconds) ${job} SKIP: source missing ($src)" | redact
  exit 0
fi

min_files="${MIN_FILES_yourdocuments:-$MIN_FILES_DEFAULT}"
max_drop="${MAX_DROP_PCT_yourdocuments:-$MAX_DROP_PCT_DEFAULT}"

echo "$(date -Iseconds) ${job} scan start (src=$src dst=$dst)" | redact
n="$(file_count "$src")"
echo "$(date -Iseconds) ${job} scan end (files=$n)" | redact

if [ "$n" -lt "$min_files" ]; then
  echo "$(date -Iseconds) ${job} SKIP: files $n < $min_files (refusing to sync)" | redact
  exit 0
fi

if [ -f "$state" ]; then
  prev="$(cat "$state" 2>/dev/null || echo 0)"
  if [ "$prev" -gt 0 ] && [ $(( n * 100 )) -lt $(( prev * (100 - max_drop) )) ]; then
    echo "$(date -Iseconds) ${job} SKIP: file count drop too large (prev=$prev now=$n max_drop=${max_drop}%)" | redact
    exit 0
  fi
fi

echo "$(date -Iseconds) ${job} sync start (dst=$dst files=$n)" | redact

fifo="/tmp/rclone_${job}.fifo"
rcfile="/tmp/rclone_${job}.rc"
rm -f "$fifo" "$rcfile"
mkfifo "$fifo"

(
  rclone sync "$src" "$dst" \
    --size-only \
    --ignore-errors \
    --smb-encoding BackSlash,Colon,Question,Asterisk,Pipe,LtGt,DoubleQuote,Ctl,Del,InvalidUtf8 \
    --inplace \
    --partial-suffix .p \
    --exclude "**/.DS_Store" \
    --checkers 4 --transfers 2 \
    --log-level "$RCLONE_LOG_LEVEL" \
    --log-format "date,time,level" \
    --stats 30s --stats-one-line --stats-one-line-date \
    --combined "/data/state/${job}.changes.log" \
    >"$fifo" 2>&1
  echo $? > "$rcfile"
) &

cat "$fifo" | redact

rc="$(cat "$rcfile" 2>/dev/null || echo 1)"
rm -f "$fifo" "$rcfile"

if [ "$rc" -eq 0 ]; then
  echo "$n" > "$state"
  echo "$(date -Iseconds) ${job} sync end (saved baseline=$n)" | redact
else
  echo "$(date -Iseconds) ${job} sync FAILED (baseline unchanged rc=$rc)" | redact
  exit 1
fi

echo "$(date -Iseconds) cycle done" | redact
Each copy is doing a slightly different job:
- Main TrueNAS: live system
- Offsite TrueNAS: full offsite replica
- UNAS: simpler, more convenient way to get a file back quickly
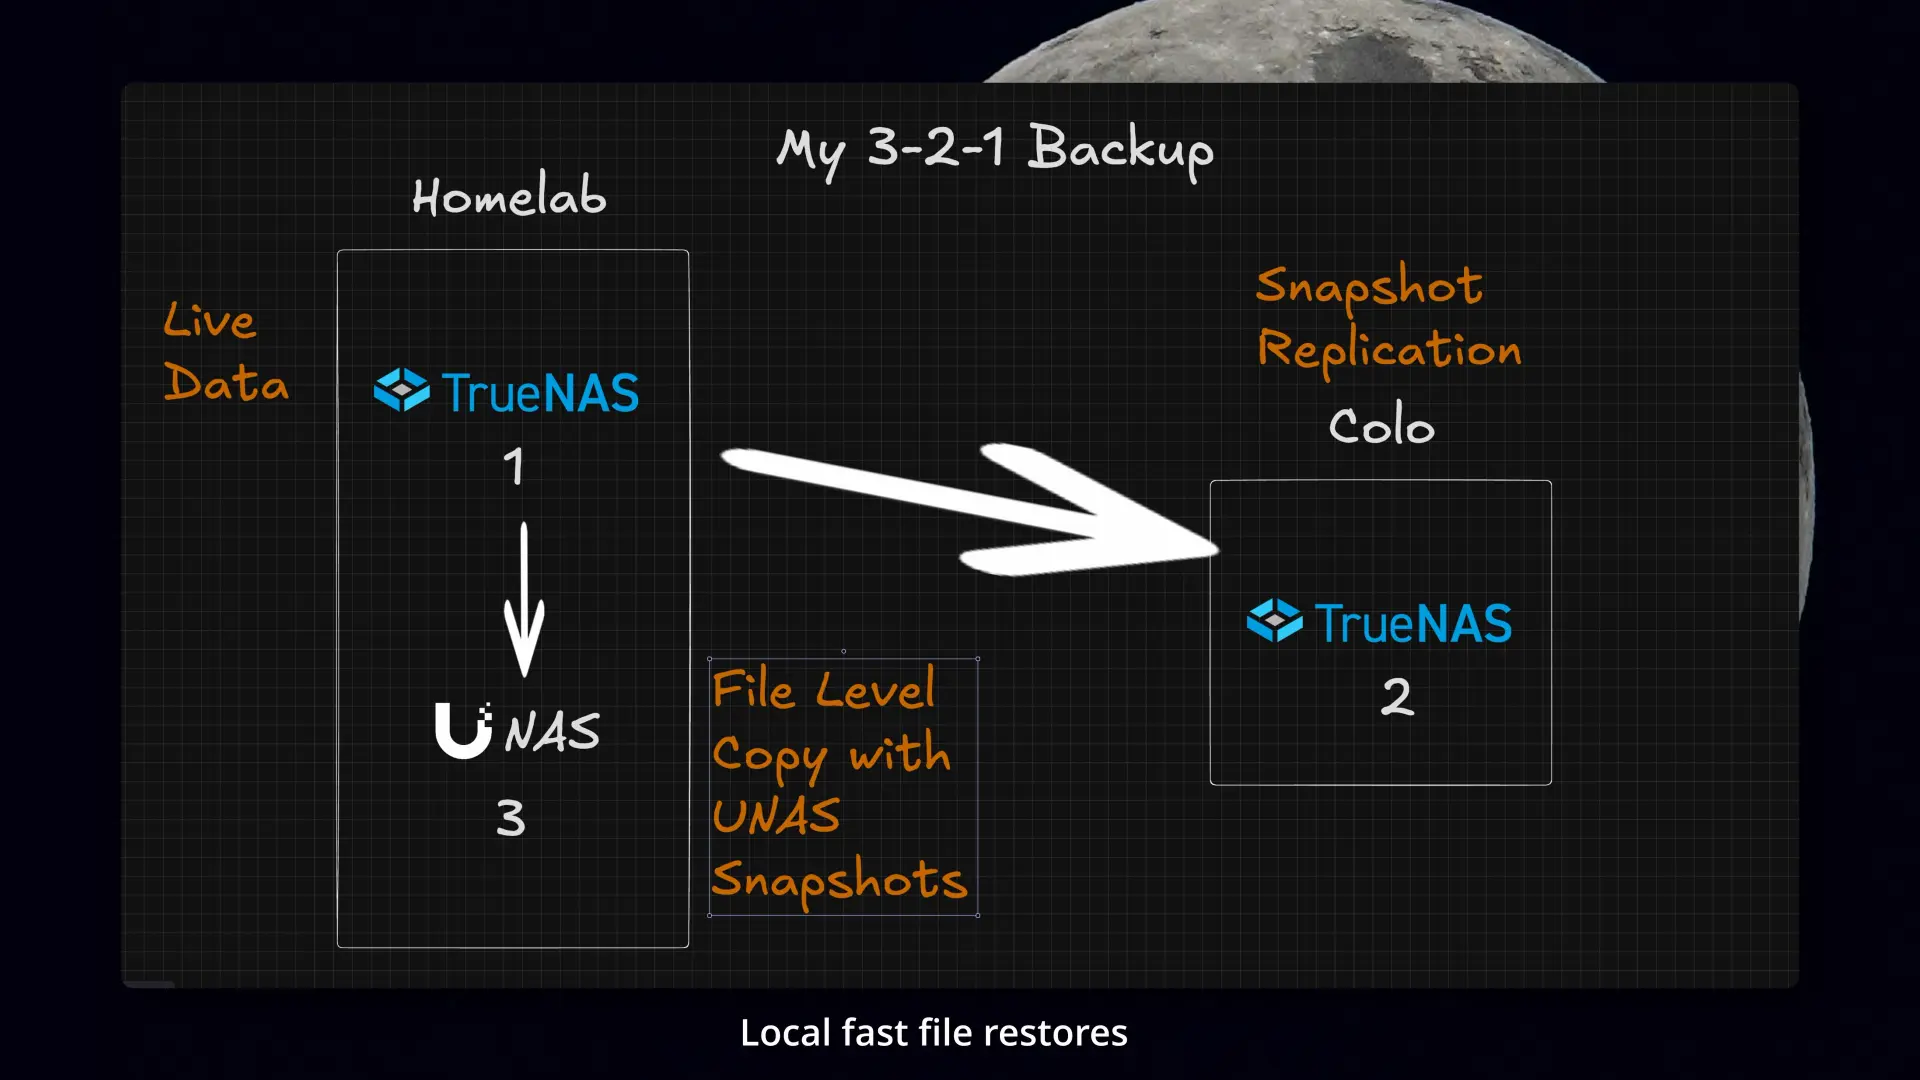 The final flow: snapshot replication offsite, plus a separate file-level copy for quick restores.
That combination feels a lot more complete to me than just making three versions of the same thing.
Colo work and a little bit of jank
Building the offsite copy was only half the job. At some point I had to take it to colo, install it, and handle the rack and network changes that came with it.
I had basically outgrown the UDM in the colo, so part of this project meant moving to a real switch with 2.5 gig. Once that was in place, I decided to upgrade all of the servers with dual 2.5GbE NICs while I was at it.
 This is the final offsite backup server once it was in the colo rack.
 Moving to a real 2.5 gig switch was part of what made the offsite side practical.
There were a bunch of smaller jobs wrapped into that too: rails, labels, and eventually replacing the UDMSE with the EFG.
And of course, no homelab project is complete without at least a little jank.
In my case, one of the servers has a GPU in it and only one usable PCIe slot, so adding the NIC turned into a whole side quest. I had to use a PCIe extension cable, remove the bracket from the NIC, and make a little case for it so it would not touch anything on the motherboard.
And by “make a little case,” I mostly mean copying and pasting a bunch of stuff from the internet into FreeCAD until I had something workable, then zip-tying it into the server and cutting a few holes so the Ethernet cables could actually get through.
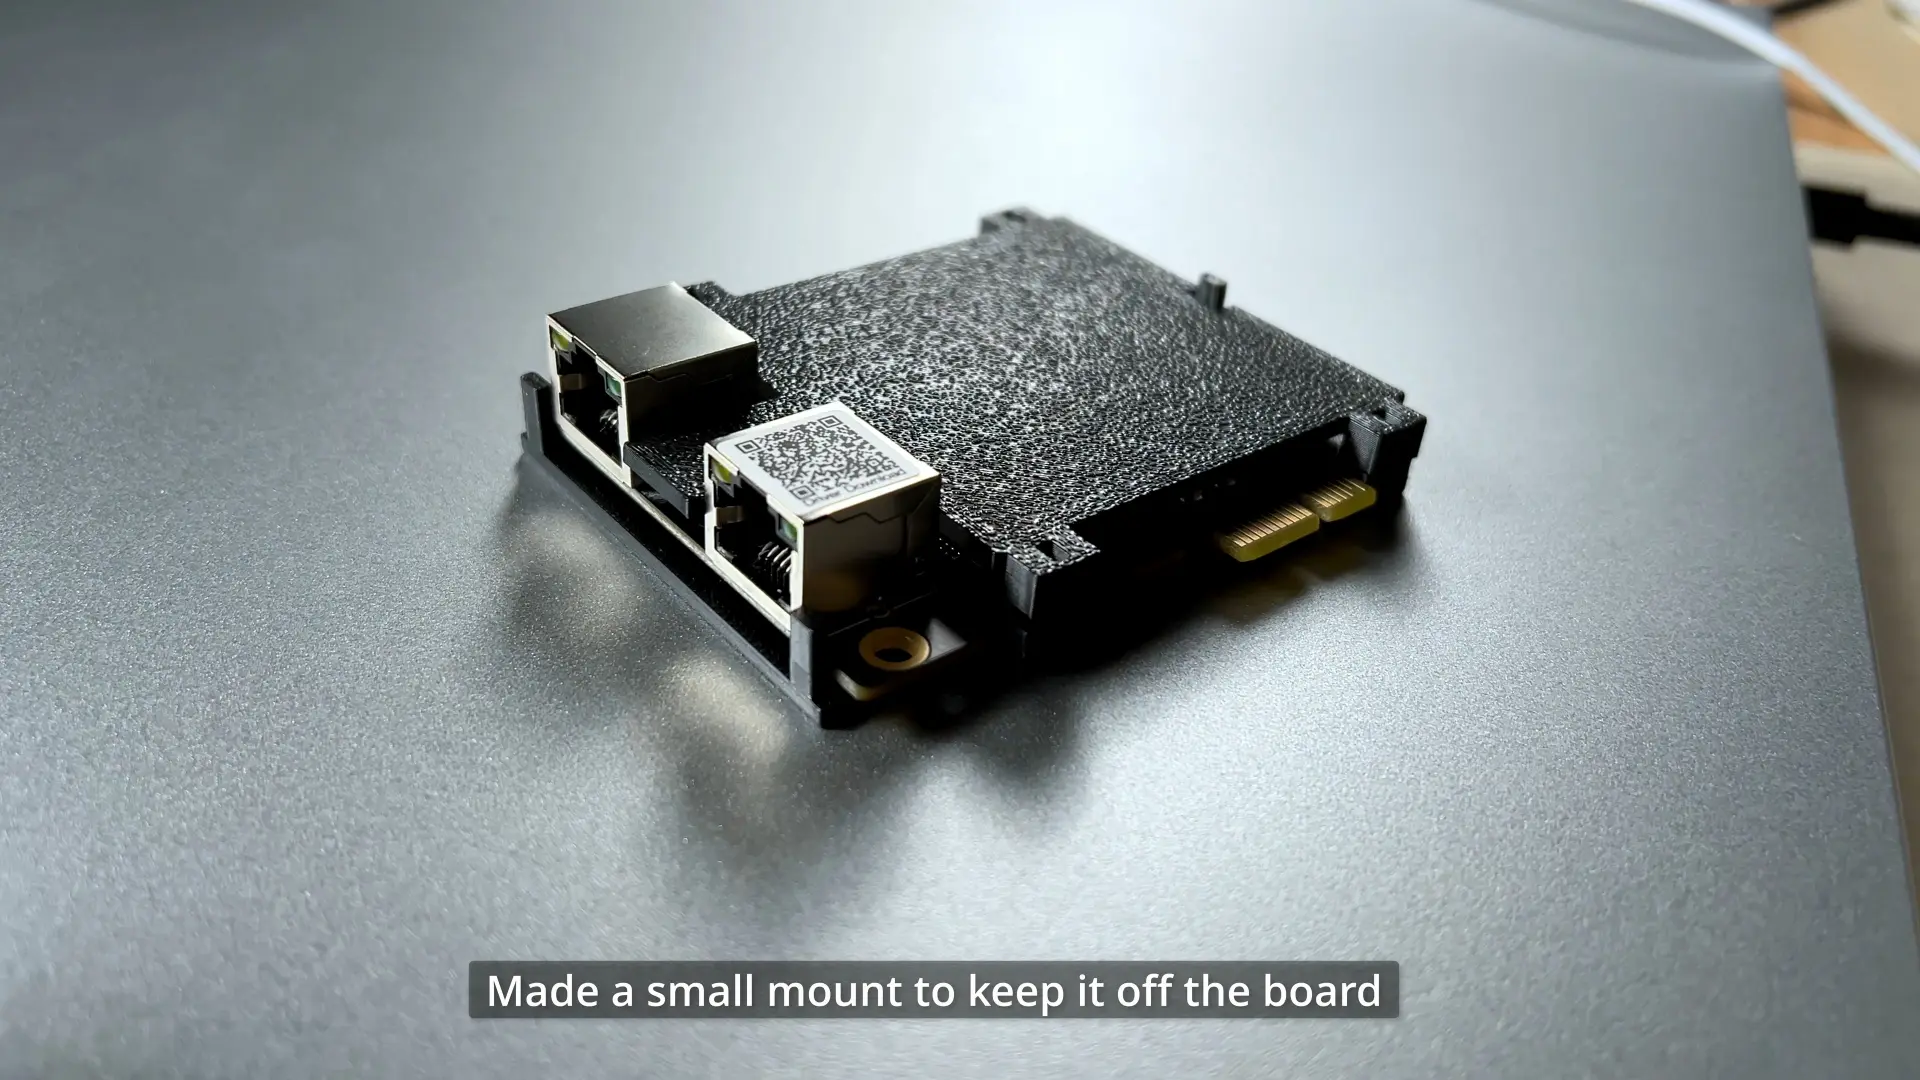 This is the little printed mount I made so the NIC would stay off the board instead of flopping around in the chassis.
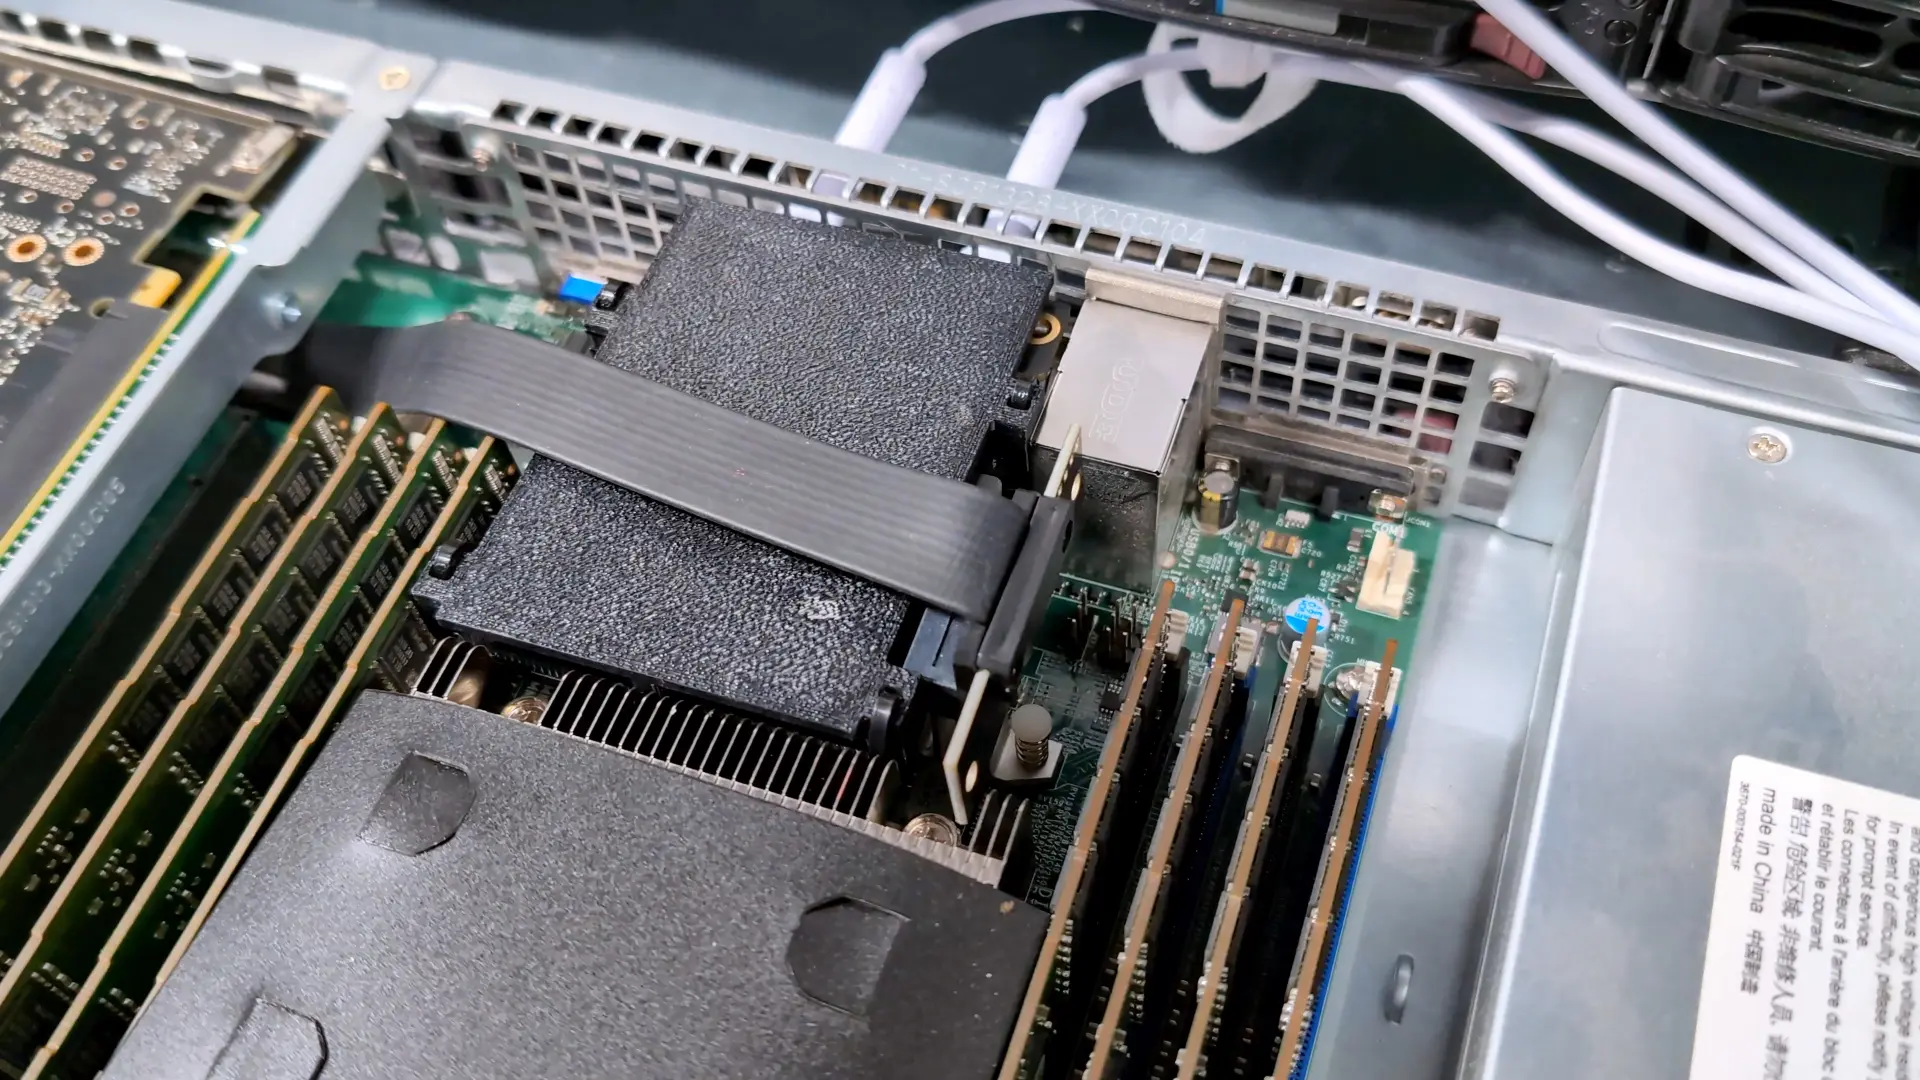 This was the final janky NIC setup once the extension cable and printed mount were inside the server.
Not pretty, but it works, and I think this might be peak homelab.
What I learned
The biggest thing this project drove home for me is that backup is not just “multiple copies exist somewhere.”
It is knowing what is protected, how current it is, and what restore actually looks like when you have to do it for real.
In my case, setting up snapshots and replication exposed that the old layout had gotten more complicated than it needed to be, and fixing that made the whole system better.
It also reminded me that a backup target is not just there waiting for disaster. The second NAS was what made this rebuild possible in the first place.
There is also real value in having different restore experiences, not just more copies on the same stack.
The real win is that I now have a backup system I understand, control, and can restore from in more than one way.
Join the conversation
I finally built a real 3-2-1 backup system for my homelab.https://t.co/UYSGcHERvv
— Techno Tim (@TechnoTimLive) April 12, 2026
🤝 Support the channel and help keep this site ad-free
⚙️ See all the hardware I recommend at https://l.technotim.com/gear