Cache NFS Files Locally with Linux FS-Cache and CacheFiles

I keep most of my AI models on TrueNAS and access them over NFS from several Linux machines. Some of those models are well over 100 GiB, and I don’t really want to maintain a separate copy on every machine. That’s why I have a NAS in the first place.
The downside to keeping files centralized shows up whenever I reload a model. Even with a fast network, reading 155 GiB over NFS takes time. I wanted to find a way to speed up those reads while keeping my model library in one place.
While looking for ways to improve NFS read performance, I came across something in Linux that I somehow hadn’t heard of before. It’s called FS-Cache, and together with CacheFiles, it can cache NFS file data on a local SSD. The original files stay on the NAS, and applications continue using the same paths. When those files are read again, Linux can use the local cache instead of fetching the data over the network.
I tried it with a real DeepSeek model snapshot. The first test used a single 3.3 GiB weight shard. It took about 4.5 seconds over NFS, then 1.7 seconds once the SSD cache was warm. With the entire 155 GiB model, the first FS-Cache read took 565 seconds (even over 10 gig it was slow!) while filling the local cache. The next read took 93 seconds. That was roughly 6.1 times faster for the full-model file read.
Those are file-read tests, not vLLM startup or inference times. I wanted to separate the time spent retrieving files from everything else that happens when a model server starts.
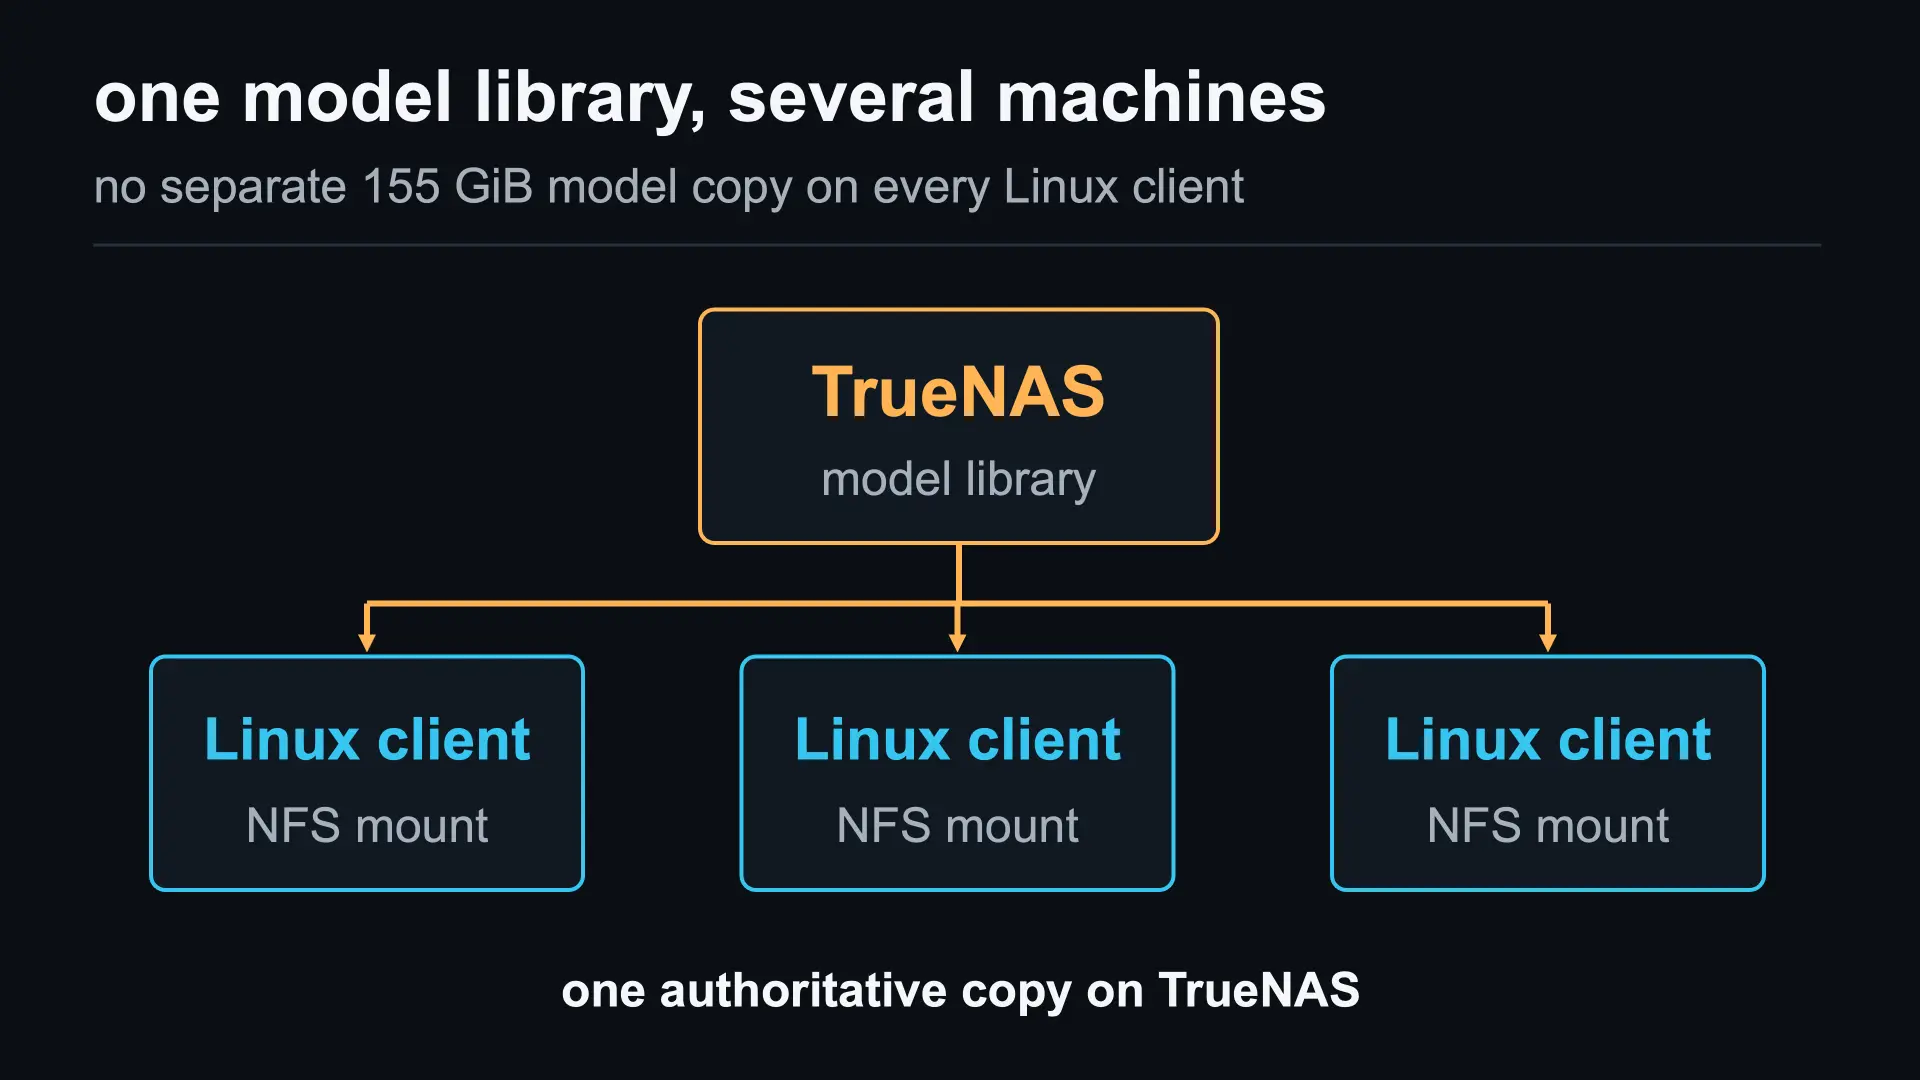
One model library on TrueNAS, shared across several Linux machines without maintaining separate copies.
How this works
NFS makes files stored on another machine available under a normal directory. In my setup the share is mounted at /mnt/llm, so an application doesn’t need to know whether a file lives on TrueNAS or a local disk.
FS-Cache is the caching framework in the Linux kernel. CacheFiles provides the local disk-backed storage, and cachefilesd registers that storage with the kernel and handles cache maintenance, including clearing older entries when space runs low.
On the first read, Linux fetches file data over NFS and can store it on the SSD. On later reads, it can use the local copy as long as the NFS client considers that cached data valid. TrueNAS remains the source of truth. There’s no script copying files back and forth, and each Linux machine caches only the data it actually reads.
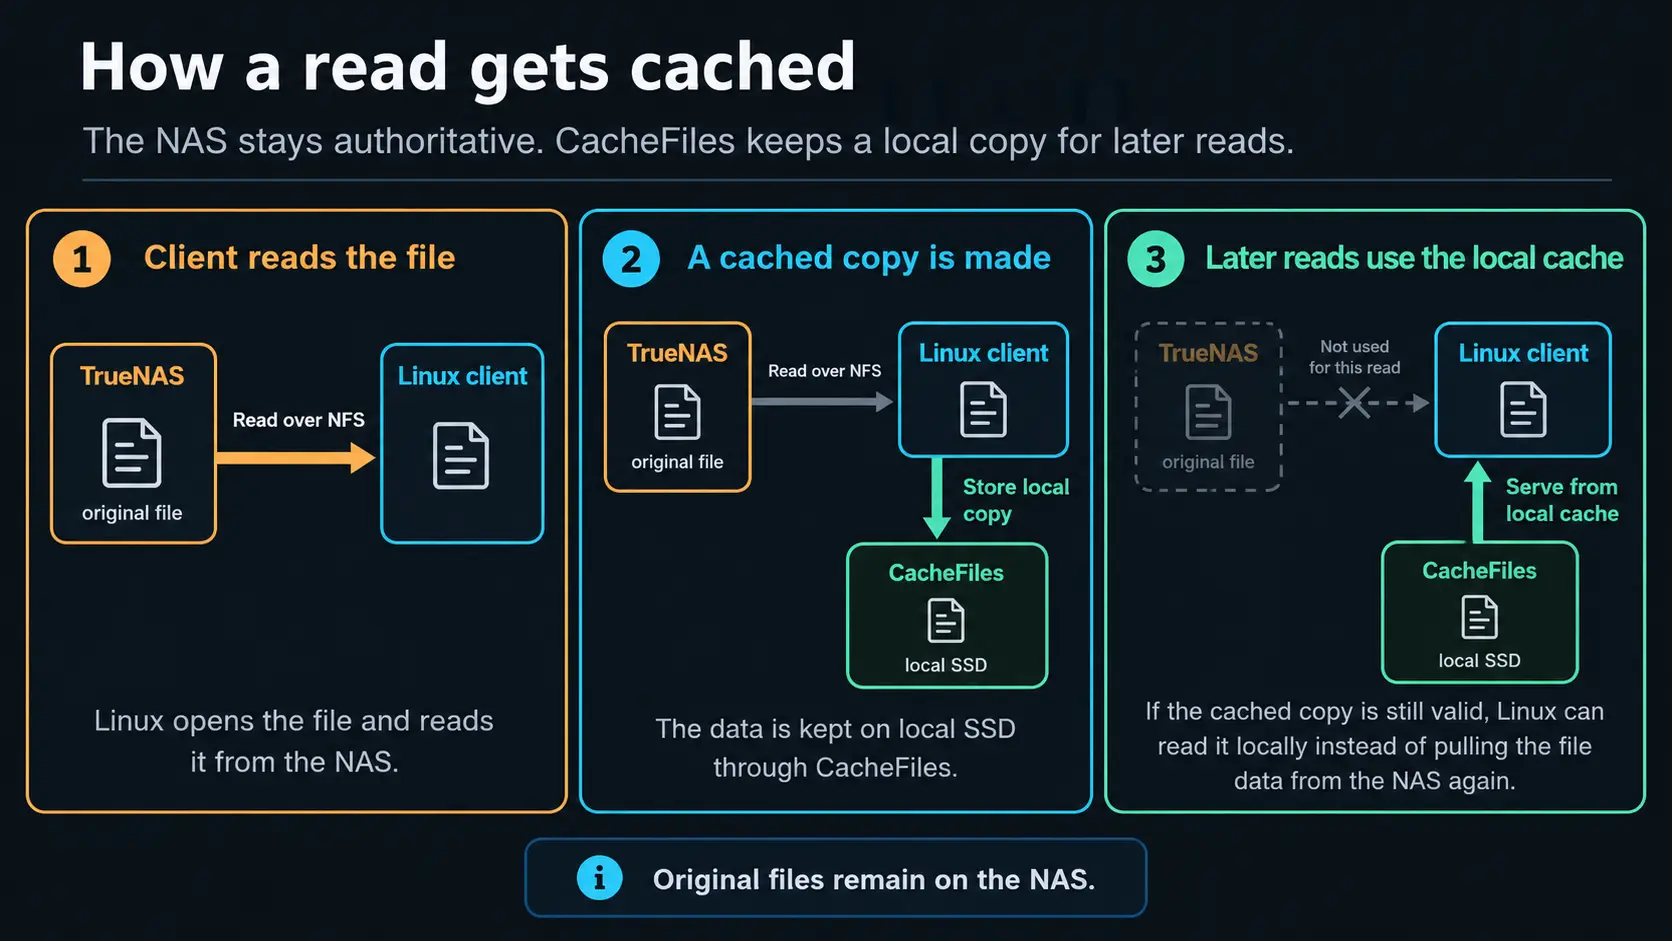
The first read retrieves data from TrueNAS and stores a local copy. Later reads can use the SSD instead.
What I’m testing
I used a fresh Ubuntu test client with an NFSv4.2 mount and an ext4 filesystem on local SSD storage. The DeepSeek snapshot had 74 regular files totaling about 155.44 GiB, including its weight shards. The demonstration uses a temporary 256 GiB ext4 cache so it doesn’t interfere with my permanent setup.
There are two tests. I’ll start with one .safetensors shard, reading it over NFS before caching is enabled and again after warming the local cache. Then I’ll clear that disk cache and read the entire model twice. The single-file test takes seconds. The full-model test shows what changes when we’re reading about 155 GiB across 74 files.
You’ll need an Ubuntu client, a working NFS export containing files you can read, and at least 300 GiB free under /var/cache for this particular demo. The 256 GiB cache image is fully allocated, so it uses real disk space. You can size the cache differently for your own workload, but the commands below use 256 GiB to match my test. The backing filesystem must support CacheFiles. I’m using ext4 here.
Info: Change these values for your environment. Replace the NAS IP and export in the mount commands, and update
/mnt/llmeverywhere if you want to use a different client-side mount point. TheMODELandONE_FILEvariables later in the guide must point to files that exist under that mount. The temporary cache uses/var/cache/fscache-demo.img,/var/cache/fscache-demo, and a 256 GiB image. Change those values together if you want to store the cache somewhere else or use a different size. The reset and cleanup commands include safety checks for these paths, so update those checks too. The NFS options, includingvers=4.2,nconnect=4,rsize, andwsize, are the settings from my test and may need to match your NFS server and client.
Warning: Use a disposable or idle test machine for this. The test clears the Linux RAM page cache for the entire client, and later steps create and delete a 256 GiB local disk image. Don’t run this over an existing CacheFiles installation or a cache volume containing data you want to keep. Use a separate test machine rather than changing an existing CacheFiles setup.
Mount the NFS share without caching
First install the NFS client and CacheFiles tools. The modprobe command loads the CacheFiles kernel module, but doesn’t enable caching by itself. I also want to check the filesystem behind /var/cache before doing anything with disk space.
1
2
3
4
5
6
sudo apt-get update
sudo apt-get install -y nfs-common cachefilesd time e2fsprogs
sudo modprobe cachefiles

df -h /var/cache
findmnt -T /var/cache -o TARGET,SOURCE,FSTYPE
For this demo, the share is read-only. That way nothing in these tests can change the model files on the NAS. I keep the NFS options the same for each run, with only the FS-Cache option changing later. The hostname isn’t needed, so I’ll enter the NAS IP.
The export and model paths are from my setup. Change them to match yours if the files are somewhere else.
1
2
3
4
5
6
7
8
9
printf 'TrueNAS IPv4 address: '
read -r NAS_IP
printf '\n'

sudo mkdir -p /mnt/llm
sudo mount -t nfs4 \
  -o ro,hard,vers=4.2,proto=tcp,rsize=1048576,wsize=1048576,nconnect=4,timeo=600,retrans=5,sec=sys \
  "${NAS_IP}:/mnt/storage0/services/llm" /mnt/llm
findmnt -M /mnt/llm -o TARGET,FSTYPE,OPTIONS
The mount uses NFSv4.2 and nconnect=4, which allows multiple TCP connections to the server. rsize and wsize set the maximum request sizes to 1 MiB. ro makes the export read-only for this test. At this point the mount should have no fsc option.
Read one model file over NFS
Before setting up the SSD cache, I want a baseline. I’ll choose one actual DeepSeek weight shard, about 3.32 GiB in my test, and read it straight from the NAS. The helper also builds a list of every file in the snapshot, ready for the full-model test later.
Hugging Face model snapshots commonly use symlinks into their blob store. find -L follows those links so we’re measuring the real data files, not just the symlinks. The file list is sorted so both full-model runs read the same files in the same order.
1
2
3
4
5
6
7
8
9
10
11
12
13
14
15
16
17
18
19
20
MODEL=/mnt/llm/models/huggingface/deepseek-ai/DeepSeek-V4-Flash-0731
MODEL_FILES=()
while IFS= read -r file; do
  MODEL_FILES+=("$file")
done < <(find -L "$MODEL" -type f | sort)

# Prefer the shard used in the benchmark when the snapshot contains it.
ONE_FILE="$MODEL/model-00025-of-00048.safetensors"
if [ ! -r "$ONE_FILE" ]; then
  ONE_FILE=$(find -L "$MODEL" -type f -name '*.safetensors' -print -quit)
fi
if [ -z "$ONE_FILE" ] || [ ! -r "$ONE_FILE" ]; then
  echo 'No readable model shard found.'
else
  stat -Lc 'Single shard: %n (%s bytes)' "$ONE_FILE"
fi

printf 'Full model files: %s\n' "${#MODEL_FILES[@]}"
find -L "$MODEL" -type f -printf '%s\n' | \
  awk '{ files++; bytes += $1 } END { printf "Total: %d files, %.2f GiB\n", files, bytes / 1073741824 }'
Next is the read helper. It accepts either shard or full, so I don’t have to change the file list between tests. That’s useful because I originally managed to restore the full list without noticing and ended up reading all 74 files when I thought I was testing one.
I’m using dd to read each file and discard the bytes into /dev/null. This doesn’t copy anything to a new file or load the model into a GPU. It measures the file-reading part of the workload. The helper prints the number of completed files, elapsed time, NFS READ data, and NFS READ requests.
Before each read, sync flushes pending writes and the drop_caches command clears Linux’s normal RAM page cache. It does not clear the SSD cache managed by CacheFiles. Without this, a second read could look fast simply because the data was still in RAM. The NFS counters come from /proc/self/mountstats, so we can also check whether a warm read really avoided network file-data transfers.
1
2
3
4
5
6
7
8
9
10
11
12
13
14
15
16
17
18
19
20
21
22
23
24
25
26
27
28
29
30
31
32
33
34
35
36
37
38
39
40
41
42
43
44
45
46
47
48
49
50
51
52
53
54
55
56
57
58
59
60
61
62
63
nfs_counters() {
  awk -v mp=/mnt/llm '
    /^device / { active = index($0, " mounted on " mp " with fstype nfs") > 0 }
    active && $1 == "bytes:" { server_bytes = $6 }
    active && $1 == "READ:" { requests = $2 }
    END {
      if (server_bytes == "" || requests == "") exit 1
      printf "%.0f %.0f\n", requests, server_bytes
    }
  ' /proc/self/mountstats
}

read_model() {
  local file before_requests before_bytes after_requests after_bytes start end
  local finished=0 total
  local -a files=()

  case "${1:-}" in
    shard)
      if [ -z "${ONE_FILE:-}" ] || [ ! -r "$ONE_FILE" ]; then
        echo 'No readable shard selected.'
        return 1
      fi
      files=("$ONE_FILE")
      ;;
    full)
      files=("${MODEL_FILES[@]}")
      ;;
    *)
      echo 'Usage: read_model shard | read_model full'
      return 2
      ;;
  esac

  total=${#files[@]}
  if (( total == 0 )); then
    echo 'No model files found. Check the model path.'
    return 1
  fi

  sync
  sudo sh -c 'echo 1 > /proc/sys/vm/drop_caches' || return 1
  read -r before_requests before_bytes < <(nfs_counters) || return 1
  start=$(date +%s%N)

  printf 'Files read: %d/%d' "$finished" "$total"
  for file in "${files[@]}"; do
    dd if="$file" of=/dev/null bs=4M status=none || { printf '\n'; return 1; }
    finished=$((finished + 1))
    printf '\rFiles read: %d/%d' "$finished" "$total"
  done
  printf '\n'

  end=$(date +%s%N)
  read -r after_requests after_bytes < <(nfs_counters) || return 1
  awk -v ns="$((end - start))" -v bytes="$((after_bytes - before_bytes))" '
    BEGIN {
      printf "Read time: %.2f seconds\n", ns / 1000000000
      printf "NFS READ data: %.2f GiB\n", bytes / 1073741824
    }
  '
  printf 'NFS READ RPCs: %s\n' "$((after_requests - before_requests))"
}
Now read the shard while the mount still has no FS-Cache enabled.
1
2
printf '\nOne shard: NFS direct (no FS-Cache)\n'
read_model shard
The selected model-00025-of-00048.safetensors shard is about 3.3 GiB. Reading it directly over NFS took about 4.5 seconds. That’s not a long time for one file, but the same wait adds up when the model has dozens of files to read.
Give CacheFiles 256 GiB of local storage
The next piece is somewhere to store cached data. I don’t want this test to keep expanding into all the free space on the SSD, so I’m putting a 256 GiB ext4 filesystem inside a preallocated image file.
That gives the cache its own filesystem, without repartitioning the drive. fallocate reserves the space up front, mkfs.ext4 formats the new image, and mount -o loop mounts it at /var/cache/fscache-demo. The guard checks refuse to overwrite an existing image or mount.
The command below creates and formats only /var/cache/fscache-demo.img. It checks that /var/cache is on ext4 and has at least 300 GiB free before starting. This is a demo-specific storage choice, not a requirement that everyone use a loopback image.
1
2
3
4
5
6
7
8
9
10
11
12
13
14
15
16
17
18
19
20
21
22
23
24
25
26
27
28
29
30
31
32
33
34
35
36
37
38
sudo bash -e <<'EOF'
IMAGE=/var/cache/fscache-demo.img
CACHE=/var/cache/fscache-demo

# Use a fresh local ext4 filesystem with room for the image and host headroom.
if [ "$(findmnt -T /var/cache -n -o FSTYPE)" != ext4 ]; then
  echo 'Expected local ext4 under /var/cache. Aborting.'
  exit 1
fi
available=$(df -B1 --output=avail /var/cache | tail -n 1 | tr -d '[:space:]')
required=$((300 * 1024 * 1024 * 1024))
if [ "$available" -lt "$required" ]; then
  echo 'Need at least 300 GiB free before creating the 256 GiB cache.'
  exit 1
fi
if [ -e "$IMAGE" ] || mountpoint -q "$CACHE"; then
  echo 'Demo cache image or mount already exists. Aborting.'
  exit 1
fi
if [ -d "$CACHE" ] && [ -n "$(ls -A "$CACHE")" ]; then
  echo 'Demo cache directory is not empty. Aborting.'
  exit 1
fi
if pgrep -x cachefilesd >/dev/null; then
  echo 'A CacheFiles daemon is already running. Use a fresh client.'
  exit 1
fi

install -d -m 0700 "$CACHE"
fallocate -l 256G "$IMAGE"
mkfs.ext4 -F -m 0 -E nodiscard "$IMAGE" >/dev/null
mount -o loop "$IMAGE" "$CACHE"
chmod 0700 "$CACHE"

findmnt -M "$CACHE" -o TARGET,SOURCE,FSTYPE,OPTIONS
df -h "$CACHE"
du -h "$IMAGE"
EOF
Once mounted, df -h /var/cache/fscache-demo shows the dedicated ext4 filesystem. The image reserves 256 GiB on the host, but the formatted filesystem shows about 251 GiB available because ext4 has its own overhead. du -h /var/cache/fscache-demo.img shows the space allocated on the host disk.
Configure CacheFiles, culling, and LRU
Now I’ll tell CacheFiles where that storage is and when it should make room. This is a small configuration file, but the settings are worth understanding rather than just pasting them in.
dir points to the cache directory we just mounted, and tag gives the cache a name. The other settings are percentages of free space or available file entries on that cache filesystem.
1
2
3
4
5
6
7
8
9
10
11
12
13
14
15
16
17
sudo tee /etc/cachefilesd-demo.conf >/dev/null <<'CONFIG'
# Where cached NFS data lives, and the name of this cache.
dir /var/cache/fscache-demo
tag llm-demo

# Free disk space: stop clearing at 25%, start at 10%, pause new allocations at 3%.
brun 25%
bcull 10%
bstop 3%

# Free file entries: the same protections for the number of cache files.
frun 10%
fcull 7%
fstop 3%
CONFIG

cat /etc/cachefilesd-demo.conf
The b settings are about free disk blocks. With this configuration, CacheFiles starts culling when free space falls below 10% (bcull). Culling simply means deleting old cached copies to make room for new data. It keeps going until free space recovers above 25% (brun). If it gets down to 3% (bstop), it stops new cache allocations until there’s room again. Reads can still fall back to the NAS.
The f settings do the same thing for available file entries, or inodes. They’re useful when there are lots of small cached files. My thresholds are 7% to begin culling, 10% to stop, and 3% to pause new allocations.
CacheFiles prefers entries that haven’t been accessed recently when it needs space. That’s LRU, short for least recently used. It doesn’t delete everything after a fixed number of hours or days. Older cached copies are candidates for removal as the cache fills up, and the original files on the NAS are never deleted by this process. There isn’t a separate lru switch to turn on.
With my 155 GiB model and a 256 GiB cache, there should be enough room for the whole snapshot. We shouldn’t trigger space-based culling during this particular test. The settings are there for when the cache eventually fills with other files.
For more detail, the CacheFiles kernel documentation covers its configuration and how culling works.
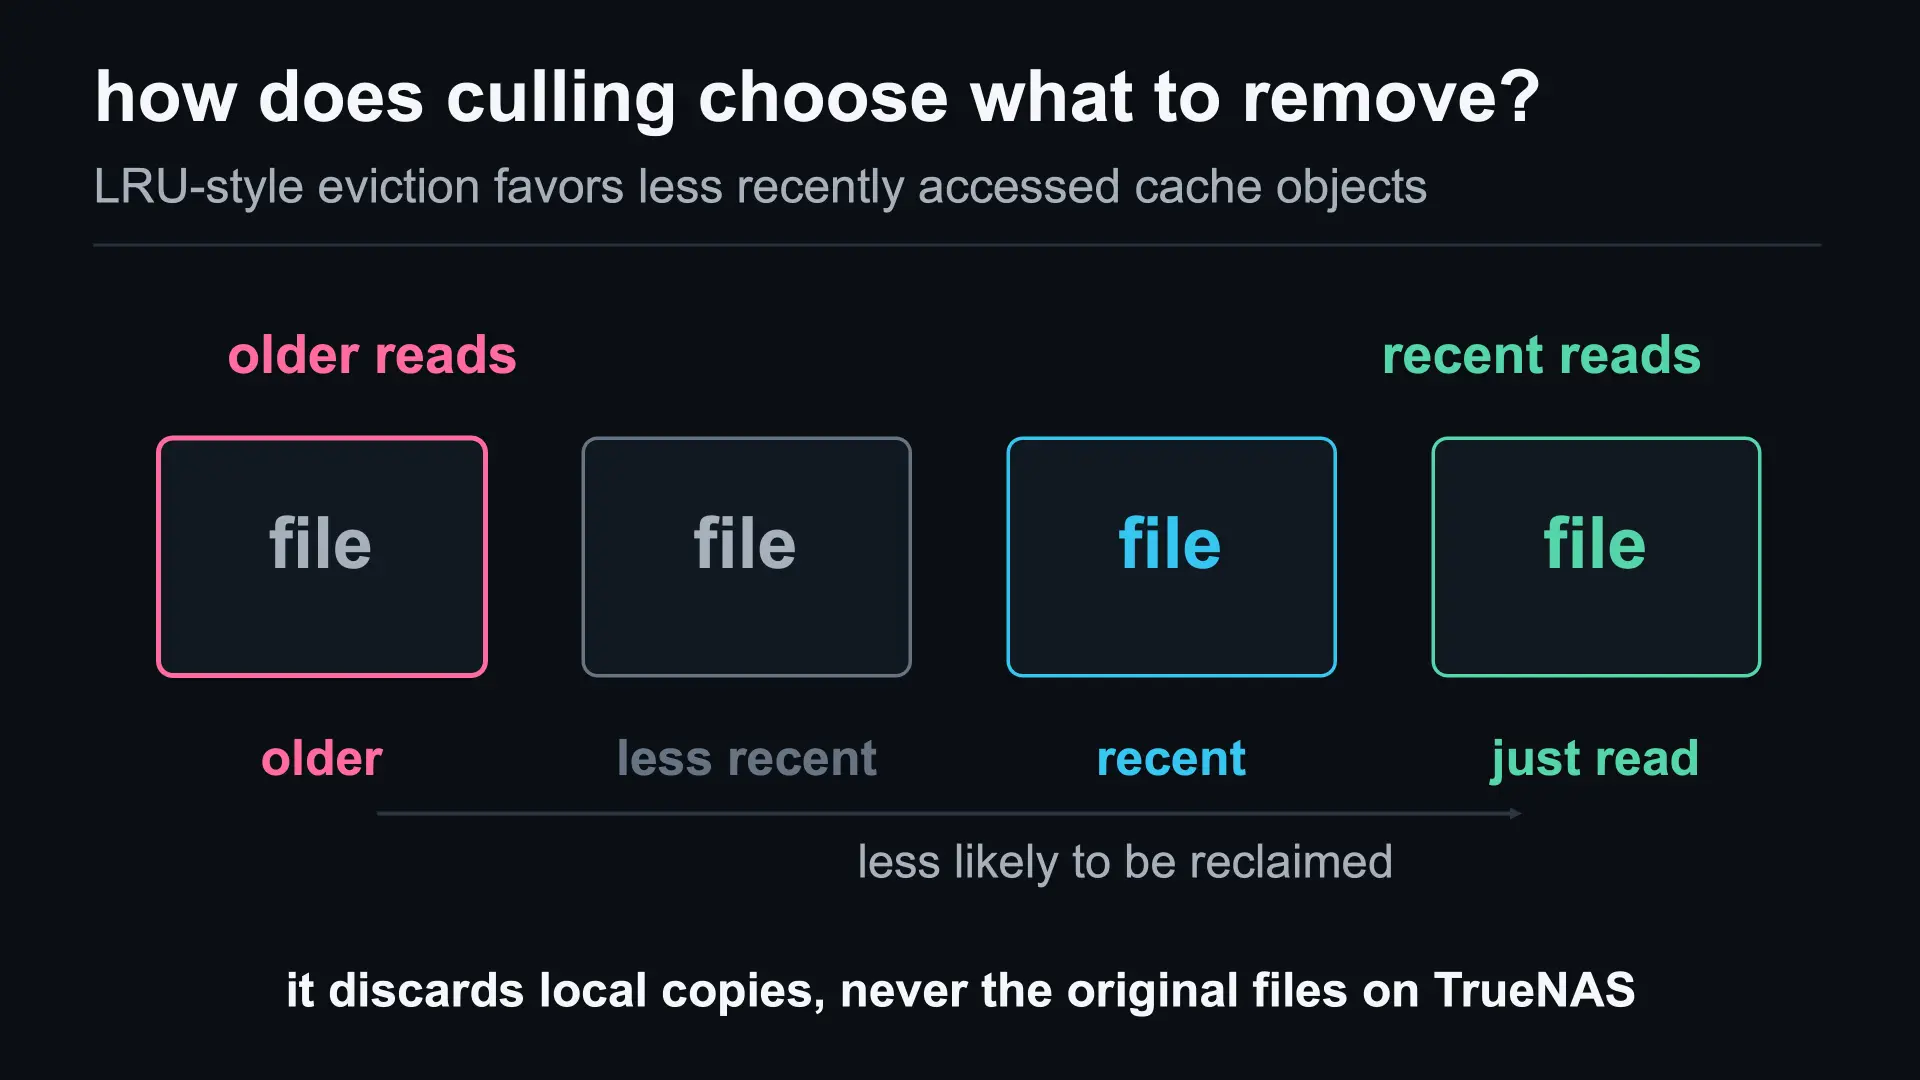
CacheFiles prefers to remove less recently used data when it needs space. Original files remain on TrueNAS.
Start the cache service
The configuration file doesn’t do anything until cachefilesd starts and registers the disk cache with the kernel. I’m starting it as a temporary systemd service rather than changing the machine’s permanent service setup. The command checks that another daemon isn’t already running, then verifies the cache is registered.
1
2
3
4
5
6
7
8
9
if pgrep -x cachefilesd >/dev/null; then
  echo 'Another cachefilesd is running. Use a clean client.'
else
  sudo systemd-run --unit=fscache-demo --property=Type=exec --collect \
    /sbin/cachefilesd -n -s -f /etc/cachefilesd-demo.conf
  systemctl is-active fscache-demo.service
  cat /proc/fs/fscache/caches
  df -h /var/cache/fscache-demo
fi
You should see fscache-demo.service active and llm-demo listed in /proc/fs/fscache/caches. That tells us the local cache is available. It still won’t be used by NFS until we enable caching on the mount.
Enable FS-Cache on NFS
This is the one change to the NFS mount that tells Linux to use its local disk cache. I’ll unmount the share, then mount it again with fsc in the options. Applications still read the same path under /mnt/llm.
1
2
3
4
5
6
cd /
sudo umount /mnt/llm
sudo mount -t nfs4 \
  -o ro,hard,vers=4.2,proto=tcp,rsize=1048576,wsize=1048576,nconnect=4,timeo=600,retrans=5,sec=sys,fsc \
  "${NAS_IP}:/mnt/storage0/services/llm" /mnt/llm
findmnt -M /mnt/llm -n -o OPTIONS | tr ',' '\n' | grep -x fsc
The last command should print fsc. If the unmount is busy, stop whatever is using /mnt/llm before retrying rather than forcing it.
Now read the same shard twice. The first pass is cold for FS-Cache. Linux reads the file from TrueNAS and can store it on the SSD as it goes. The second pass clears RAM again but leaves the SSD cache in place.
1
2
3
4
5
printf '\nOne shard: FS-Cache cold\n'
read_model shard

printf '\nOne shard: FS-Cache warm\n'
read_model shard
On the warm pass you should see zero NFS READ requests if that shard was fully cached and still valid. The client can still contact TrueNAS for metadata checks, but the file data doesn’t need to cross the network again.
The first FS-Cache read also took about 4.5 seconds because Linux still had to retrieve the file over NFS. After it had cached the shard, the same read dropped to 1.7 seconds. That’s roughly two and a half times faster using the rounded timings from the test.
The timer is useful, but don’t rely on it alone to prove the cache is working. The helper also reports NFS READ data and request counts. On a successful warm read, those counters should stay at or near zero, even though NFS might still contact the server for metadata validation.
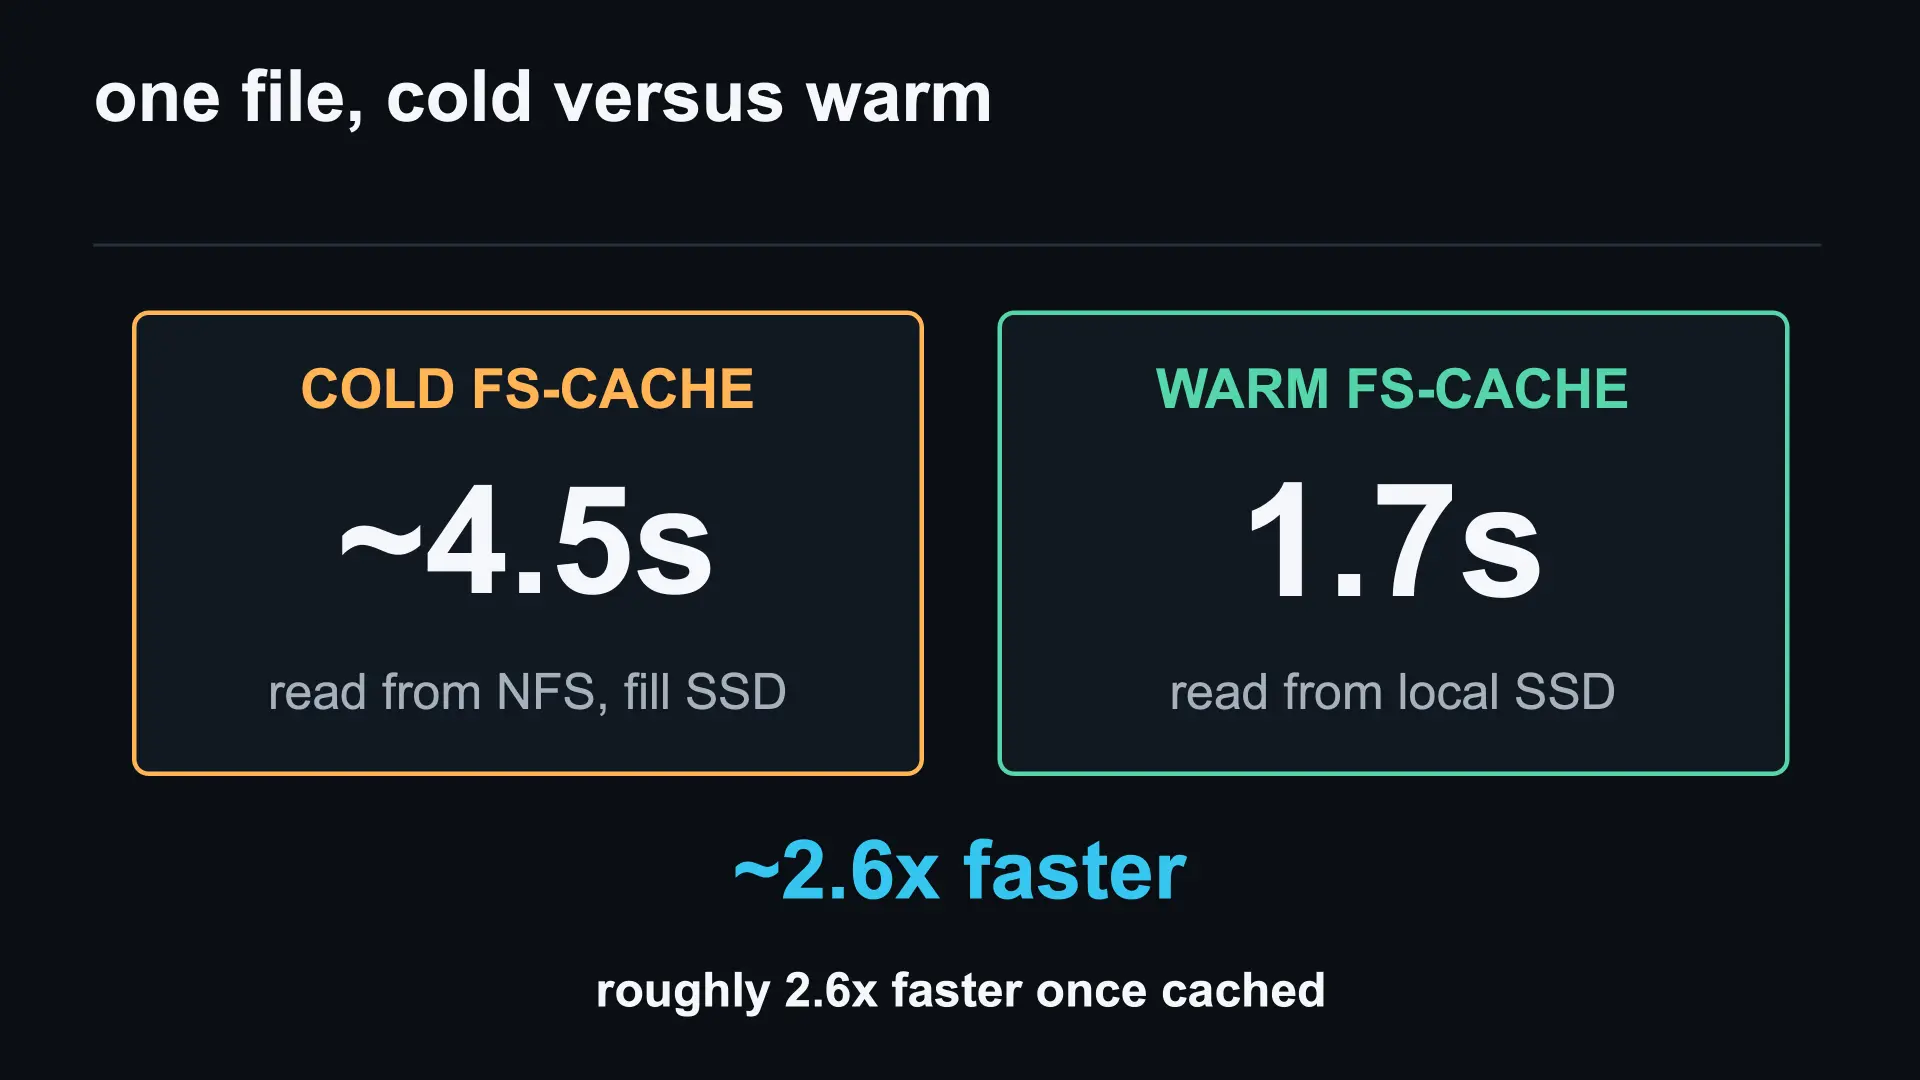
Reading the same 3.3 GiB model shard dropped from about 4.5 seconds to 1.7 seconds once cached locally, roughly 2.6 times faster.
Clear the SSD cache before testing the entire model
Now I’ll move from one file to the full model. But that shard is already on the SSD. If I started the full-model test immediately, its first run wouldn’t be completely cold.
The read helper clears RAM between passes. For a fresh disk-cache test, we need to unmount NFS, stop the CacheFiles daemon, clear the temporary cache contents, restart the daemon, and remount NFS with fsc. The 256 GiB image and its configuration stay in place, so there’s no reason to allocate it all over again.
This block only belongs on the disposable demo client. It checks the NFS export and the loop-mounted ext4 cache before deleting cache objects. It deliberately leaves lost+found alone. If any check fails, it stops instead of deleting unknown files.
1
2
3
4
5
6
7
8
9
10
11
12
13
14
15
16
17
18
19
20
21
22
23
24
25
26
27
28
29
30
31
32
33
34
35
36
37
38
39
40
41
42
43
44
45
46
47
48
49
50
51
52
cd /  # Leave the NFS mount in this terminal, too.
sudo bash -e <<'EOF'
cd /
IMAGE=/var/cache/fscache-demo.img
CACHE=/var/cache/fscache-demo

# Remember the existing NFS source.
NFS_SOURCE=$(findmnt -M /mnt/llm -n -o SOURCE)
NFS_TYPE=$(findmnt -M /mnt/llm -n -o FSTYPE)
if [ "$NFS_TYPE" != nfs4 ]; then
  echo 'Expected an NFSv4 mount at /mnt/llm. Aborting.'
  exit 1
fi
case "$NFS_SOURCE" in
  *:/mnt/storage0/services/llm) ;;
  *) echo 'Unexpected NFS export. Aborting.'; exit 1 ;;
esac

# Stop all users of the cache before deleting its contents.
umount /mnt/llm
systemctl stop fscache-demo.service
if pgrep -x cachefilesd >/dev/null; then
  echo 'CacheFiles is still running. Aborting.'
  exit 1
fi

# Confirm this is the demo's loop-backed ext4 filesystem.
cache_device=$(findmnt -M "$CACHE" -n -o SOURCE)
cache_fs=$(findmnt -M "$CACHE" -n -o FSTYPE)
loop_device=$(losetup -j "$IMAGE" -n -O NAME | head -n 1)
if [ "$cache_fs" != ext4 ] ||
   [ -z "$loop_device" ] ||
   [ "$cache_device" != "$loop_device" ]; then
  echo 'The mounted cache does not match our demo image. Aborting.'
  exit 1
fi

# Remove cached objects, not the filesystem or reserved image.
find "$CACHE" -mindepth 1 -maxdepth 1 ! -name lost+found -exec rm -rf -- {} +

# Restart the temporary daemon and restore the NFS mount.
systemctl start fscache-demo.service 2>/dev/null || \
  systemd-run --unit=fscache-demo --property=Type=exec --collect \
    /sbin/cachefilesd -n -s -f /etc/cachefilesd-demo.conf
systemctl is-active --quiet fscache-demo.service
mount -t nfs4 \
  -o ro,hard,vers=4.2,proto=tcp,rsize=1048576,wsize=1048576,nconnect=4,timeo=600,retrans=5,sec=sys,fsc \
  "$NFS_SOURCE" /mnt/llm
findmnt -M /mnt/llm -n -o OPTIONS | tr ',' '\n' | grep -qx fsc

echo 'Local cache emptied. Ready for a fresh cold read.'
EOF
After the reset, du -sh /var/cache/fscache-demo should show very little cached data and the NFS mount should still have fsc enabled. Use this reset whenever you need a cold disk cache for another experiment.
Read all 74 model files, cold and warm
Now we can run the full-model test. The helper reads every regular file in the snapshot, including the weight shards, using the same order for both passes. It prints a live completed-file counter, so you can see it move from 0/74 to 74/74.
The first pass gets data from TrueNAS and fills CacheFiles. The second pass clears RAM again and rereads everything with the local disk cache already warm.
1
2
3
4
5
6
7
printf '\nFull model: FS-Cache cold (empty SSD cache)\n'
read_model full
sudo du -sh /var/cache/fscache-demo
df -h /var/cache/fscache-demo

printf '\nFull model: FS-Cache warm (local SSD)\n'
read_model full
The first full-model pass took 565 seconds, or a little over nine minutes. All 74 files were read over NFS while CacheFiles filled the SSD, and the local cache grew to about 155 GiB. The warm pass took 93 seconds, around a minute and a half.
That’s about 6.1 times faster for reading the full model once the cache was warm. The first result is FS-Cache cold, which includes writing the files to local storage as they’re read. It isn’t a separate NFS-only full-model measurement. These are file reads with dd, not complete model startup or inference times.
What I measured
These are the measurements from the tests. The single-shard times are rounded.
| Test | FS-Cache cold | FS-Cache warm | Improvement |
|---|---|---|---|
| One 3.3 GiB shard | ~4.5 s | 1.7 s | ~2.6x |
| Entire model, 74 files (155.44 GiB) | 565 s | 93 s | ~6.1x |
The NAS and test client were connected over 10 GbE for these measurements. On a slower network, the initial read from TrueNAS can take longer, so the improvement from a warm local cache may be larger. The actual result still depends on the client’s SSD, the network, and whether the files remain cached.
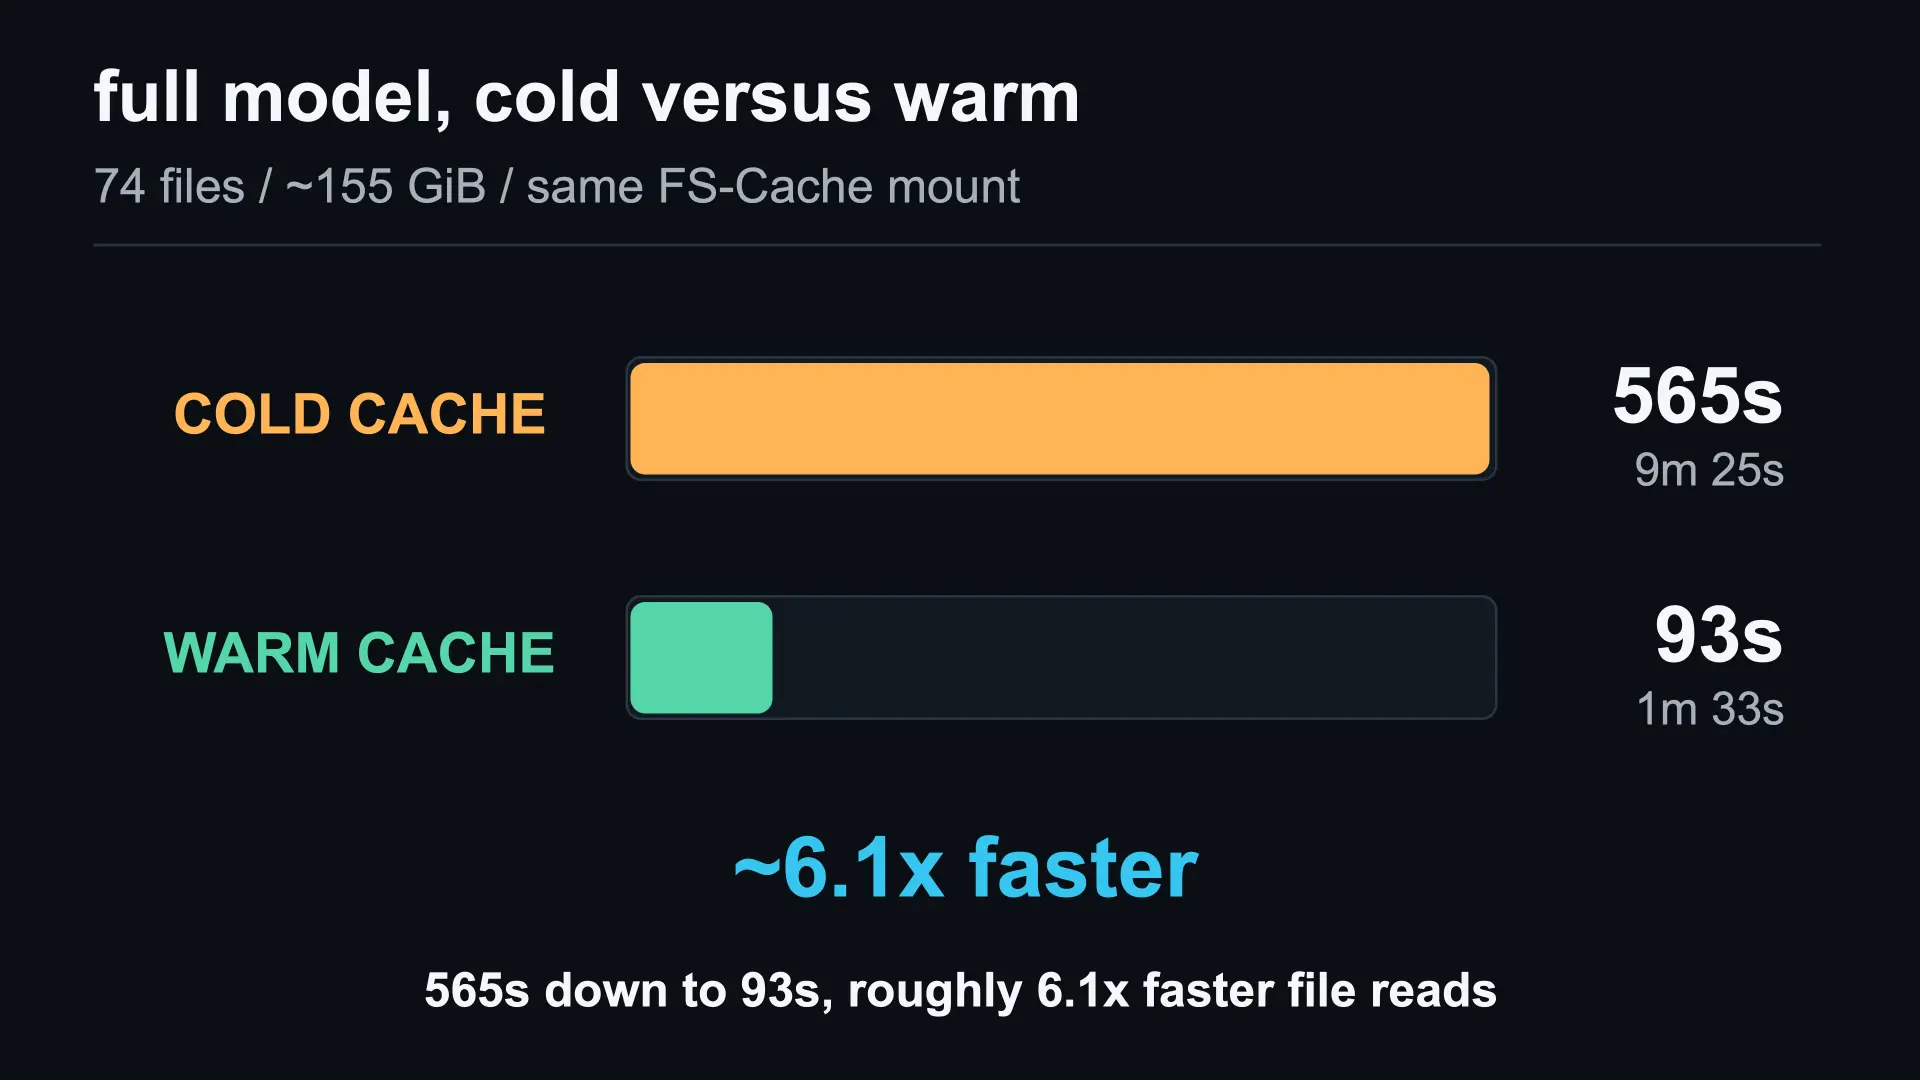
Reading all 74 model files dropped from 565 seconds to 93 seconds with a warm SSD cache, about 6.1 times faster.
The one-shard baseline was measured without fsc. Its first read after enabling FS-Cache took about the same time because Linux had to fetch the file from NFS and populate the local cache. The full-model comparison started with FS-Cache already enabled, so 565 seconds includes filling the local SSD. There isn’t a separate NFS-only full-model measurement in this test.
The improvement depends on the network, the local storage and whether the files are already cached. The test uses sequential buffered file reads into /dev/null. A model server still has to initialize the runtime and load the weights, and it might read files differently. These timings only isolate the file-reading portion.
Where I’d use this, and where I wouldn’t
This is useful for the problem I started with. I have large model files on a NAS and sometimes need to read the same ones again on the same machine. It’s also worth considering for read-heavy shared datasets, installers, Linux ISOs, or other files that get accessed repeatedly.
But FS-Cache is a read cache. It isn’t a general-purpose write cache, and if a file only gets read once, writing a local copy doesn’t help that first read. If the working set grows beyond the cache, older data gets culled and has to be fetched again when needed.
For application-level data caching, Redis or Valkey may make more sense. If you’re trying to cache local block storage, tools such as bcache or dm-cache solve a different problem. Those aren’t drop-in replacements for NFS FS-Cache. The right choice depends on what you’re trying to speed up.
My permanent setup
This tutorial uses a temporary service and loopback filesystem so the demo is easy to repeat and clean up. It isn’t a persistent production configuration. If you want to keep a cache across reboots, you’ll need to mount its local filesystem before starting cachefilesd, configure the daemon to start reliably, and enable fsc on the NFS mount.
I manage that setup with Ansible, so I can make the same changes across multiple Linux machines without maintaining the configuration by hand.
Clean up the demo
When you’re done, this removes the temporary NFS mount, stops the demo daemon, unmounts its ext4 image, and deletes the image and config. The 256 GiB host disk allocation is released. It leaves the installed packages and all the original files on TrueNAS alone.
Only use this on the dedicated demo machine. Close any processes using /mnt/llm before running it. The checks stop the command if the cache filesystem isn’t the loopback image created by this tutorial.
1
2
3
4
5
6
7
8
9
10
11
12
13
14
15
16
17
18
19
20
21
22
23
24
25
26
27
28
29
30
31
32
33
34
35
36
37
38
39
40
41
42
43
44
45
46
47
48
49
50
51
52
53
54
55
cd /  # Leave the NFS mount in this terminal, too.
sudo bash -e <<'EOF'
cd /
IMAGE=/var/cache/fscache-demo.img
CACHE=/var/cache/fscache-demo

# Unmount the demo NFS share only.
if mountpoint -q /mnt/llm; then
  NFS_SOURCE=$(findmnt -M /mnt/llm -n -o SOURCE)
  NFS_TYPE=$(findmnt -M /mnt/llm -n -o FSTYPE)
  if [ "$NFS_TYPE" != nfs4 ]; then
    echo 'Unexpected filesystem at /mnt/llm. Aborting.'
    exit 1
  fi
  case "$NFS_SOURCE" in
    *:/mnt/storage0/services/llm) ;;
    *) echo 'Unexpected NFS export. Aborting.'; exit 1 ;;
  esac
  umount /mnt/llm
fi

# Stop the daemon before unmounting its local filesystem.
systemctl stop fscache-demo.service 2>/dev/null || true
if pgrep -x cachefilesd >/dev/null; then
  echo 'CacheFiles is still running. Aborting.'
  exit 1
fi

# Verify the mounted cache belongs to the demo image.
if mountpoint -q "$CACHE"; then
  cache_device=$(findmnt -M "$CACHE" -n -o SOURCE)
  cache_fs=$(findmnt -M "$CACHE" -n -o FSTYPE)
  loop_device=$(losetup -j "$IMAGE" -n -O NAME | head -n 1)
  if [ "$cache_fs" != ext4 ] ||
     [ -z "$loop_device" ] ||
     [ "$cache_device" != "$loop_device" ]; then
    echo 'Unexpected filesystem at the cache mount. Aborting.'
    exit 1
  fi
  umount "$CACHE"
fi

# Don't delete an image that's still attached to a loop device.
if [ -e "$IMAGE" ] && losetup -j "$IMAGE" | grep -q .; then
  echo 'The demo image is still attached to a loop device. Aborting.'
  exit 1
fi

rm -f -- /etc/cachefilesd-demo.conf "$IMAGE"
rmdir "$CACHE" 2>/dev/null || true
rmdir /mnt/llm 2>/dev/null || true
systemctl reset-failed fscache-demo.service 2>/dev/null || true

echo 'Demo cleanup complete. The 256 GiB cache image is gone.'
EOF
I like that I can keep the model library centralized while each machine uses its own SSD for files it keeps reading. There’s some setup involved, and it won’t help every workload, but for repeated NFS reads it’s been a useful addition to my homelab.
If you want to dig into the implementation, the Linux CacheFiles documentation is a good reference.